Installation von boot9strap (Soundhax)
Für Support auf Englisch, bitte um Hilfe auf dem Nintendo Homebrew Discord.
Wenn du diese Anleitung wertschätzt, akzeptieren wir auch Spenden.
Technische Details (optional)
For technical details on the exploits that you will be using on this page, see here (Soundhax) and here (universal-otherapp).
Kompatibilitätshinweise
Soundhax (when combined with universal-otherapp) is compatible with versions 1.0.0 through 11.3.0 in all regions.
Was du brauchst
- The latest release of Soundhax (for your region, console, and version)
- If Soundhax appears in your browser as an unplayable video, press Ctrl+S or Cmd+S to save it to your computer
- Die neueste Version vom SafeB9SInstaller (Direkter Download)
- Die neueste Version von boot9strap (Direkter Download)
- Die neueste Version von Luma3DS (die Luma3DS
.zipDatei) - Die neueste Version von universal-otherapp (
otherapp.bin)
Anleitung
Abschnitt I - Vorbereitungen
In this section, you will copy the files needed to trigger both Soundhax and universal-otherapp.
- Power off your console
- Stecke deine SD-Karte in deinen Computer
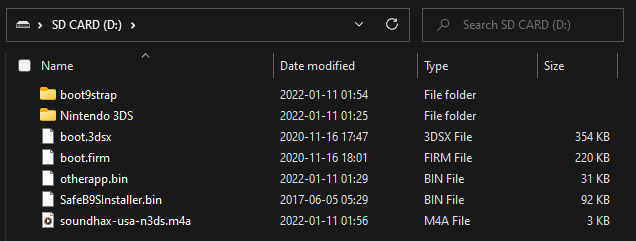
- Kopiere die Soundhax
.m4ain das Stammverzeichnis der SD-Karte- The root of the SD card refers to the initial directory on your SD card where you can see the Nintendo 3DS folder, but are not inside of it
- Copy
otherapp.binto the root of your SD card - Copy
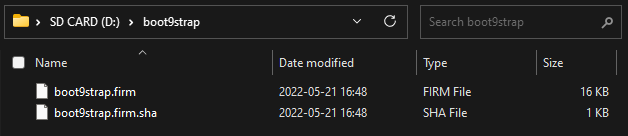
boot.firmandboot.3dsxfrom the Luma3DS.zipto the root of your SD card - Erstelle einen Ordner namens
boot9strapim Stammverzeichnis deiner SD-Karte - Kopiere
boot9strap.firmundboot9strap.firm.shaaus der boot9strap.zipin den/boot9strap/-Ordner auf deiner SD-Karte - Copy
SafeB9SInstaller.binfrom the SafeB9SInstaller.zipto the root of your SD card - Stecke deine SD-Karte wieder in deine Konsole
- Power on your console
Schritt II - Starten von SafeBS9Installer
In this section, you will launch Soundhax through the Nintendo 3DS Sound app, which will use universal-otherapp to launch the boot9strap (custom firmware) installer.
-
Starte die Nintendo 3DS Sound App
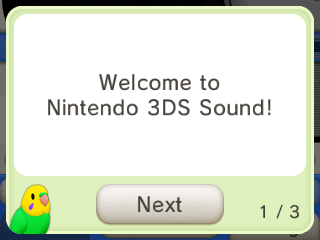
- Wenn sie noch nie den Nintendo 3DS Sound geöffnet haben, schauen sie sich die Tipps an, wie man es benutzt. Die Tipps erhalten sie wenn sie auf das Vogel-Symbol klicken. Gucken sie alle Tipps an, schließen sie danach die App, und starten sie wieder erneut
- In dieser Situation würde das Starten von Soundhax sofort dazu führen, dass diese Tipps, bei jedem Start des Nintendo 3DS Sound angezeigt werden, bis dies geschehen ist
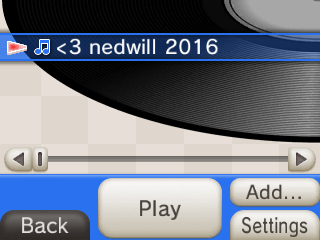
- Gehe zu
/SDCARDund spiele die Datei “<3 nedwill 2016” ab- This may take many (up to 10) tries
- If you see the message “Could not play”, you are either on a system version incompatible with Soundhax or downloaded the wrong Soundhax release
- If it freezes, force the console to power off by holding the power button, then try again
- If you get a different error, follow this troubleshooting guide
- Wenn der Exploit erfolgreich war, wird SafeBS9Installer gestartet
Schritt III - boot9strap installieren
In this section, you will install custom firmware onto your console.
- Wenn du gebeten wirst, eine Tastenkombination einzugeben, gib die Tastenkombination auf dem oberen Bildschirm ein, um boot9strap zu installieren
- If a step on the lower screen has red-colored text, and you are not prompted to input a key combo, follow this troubleshooting guide
- Once it is complete, press (A) to reboot your console
- Deine Konsole sollte in das Luma3DS Konfigurations-Menü gestartet haben
- Das Luma3DS Konfigurations-Menü enthält Einstellungen für die Luma3DS Custom Firmware. Viele dieser Einstellungen können nützlich für Personalisierung oder Debugging sein
- Für den Zweck dieser Anleitung lasse alle Optionen auf ihren Standardeinstellungen (aktiviere oder deaktiviere nichts)
- Wenn sich deine Konsole beim Starten direkt wieder ausschaltet, solltest du sicherstellen, dass du
boot.firmaus der Luma3DSzipDatei in das Stammverzeichnis deiner SD-Karte kopiert hast
- Drücke (Start) um zu Speichern und neu zu starten
Ab diesem Punkt wird deine Konsole standardmäßig Luma3DS starten.
- Luma3DS sieht nicht anders aus als das normale HOME-Menü. Wenn deine Konsole in das HOME-Menü gestartet ist, läuft Custom Firmware auf ihr.
- Auf der nächsten Seite wirst du nützliche Homebrew Apps installieren, um die Installation abzuschließen.