Installing boot9strap (MSET9 CLI)
Technische Details (optional)
MSET9 is an exploit for the System Settings application developed by zoogie. It exploits a flaw where the ID1 (the second 32-character folder name inside of the Nintendo 3DS folder, inside of the ID0) can be any name as long as it is 32 characters. Performing a specific sequence of actions results in the console executing the instructions that are encoded into the ID1 folder name, which can be used to grant full control over the 3DS.
Kompatibilitätshinweise
This page requires a computer running Windows, Linux, or macOS. If you have an Android phone/tablet or a Chromebook, follow Installing boot9strap (MSET9 Play Store) instead. If you do not have access to any of these devices, you will need to use an alternate exploit.
Was du brauchst
- The latest release of MSET9 (the Release
.zipfile) - Any 3.x version of Python installed on your computer
- If you are on Linux or macOS, you may already have Python 3. Check by opening a Terminal window and entering
python3 -V. If this returns a version number, it will work for this guide.
- If you are on Linux or macOS, you may already have Python 3. Check by opening a Terminal window and entering
Anleitung
On this page, you will use the MSET9 script, which is used to trigger MSET9. If you get a numbered error (e.g. Error 01) when running the script, the solution to that error can most likely be found on the troubleshooting page.
Abschnitt I - Vorbereitungen
In this section, you will prepare the SD card data necessary for the MSET9 exploit to trigger.
- Power on your console with your SD card inserted
- Open Mii Maker
- Wait for your console to reach the “Welcome to Mii Maker” screen, then exit Mii Maker
- You may see this screen, which indicates the necessary data has been created
- If you just reach the normal Mii Maker screen, exit Mii Maker and continue to the next step
- Power off your console
- Stecke deine SD-Karte in deinen Computer
-
Copy everything from the Release
.zipto the root of your SD card, overwriting any existing files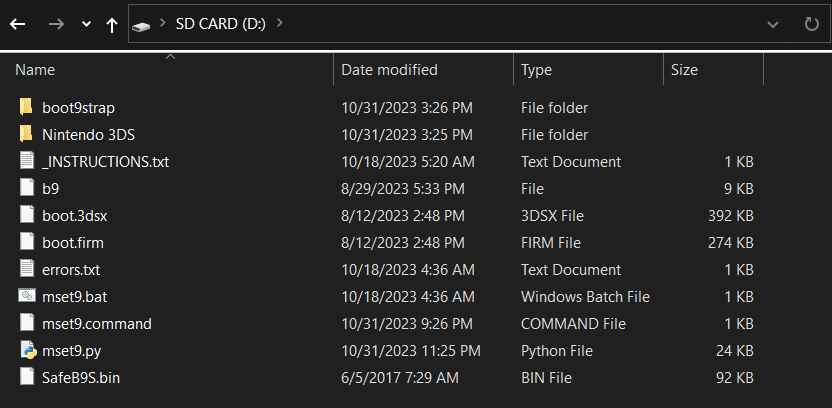
- Run the MSET9 script:
- Windows: Double-click
mset9.bat - macOS: Double-click
mset9.commandand enter your password if prompted - Linux: open a Terminal window,
cdto the root of your SD card, then typepython3 mset9.pyand press Enter
- Windows: Double-click
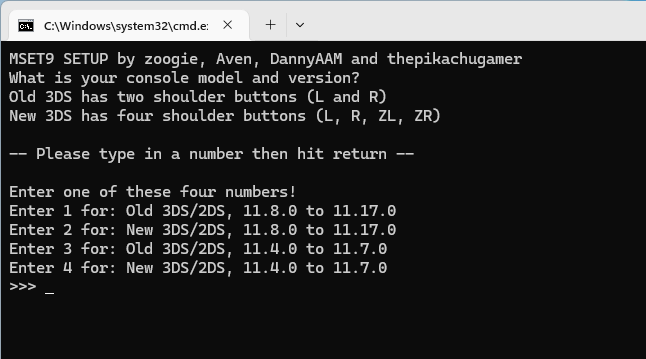
- Type the number corresponding to your console model and version, then press Enter
- The window should change to this:
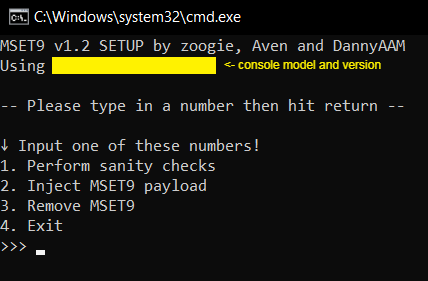
- Ensure that the correct console model and version is displayed
- Type
1, then press Enter to ensure your console is prepared for MSET9- If you get an error, check the troubleshooting, then try again
- If you get “Error 10: Database(s) malformed or missing!”, follow the instructions here, then go back to Step 7 of this section
- If you see the message “Everything appears to be functional!”, press Enter to close the MSET9 script
- Stecke deine SD-Karte wieder in deine Konsole
- Power on your console
Section II - MSET9
In this section, you will trigger MSET9 to launch SafeB9SInstaller (the custom firmware installer).
These instructions must be followed EXACTLY, so double-check EVERYTHING you are doing to avoid errors!
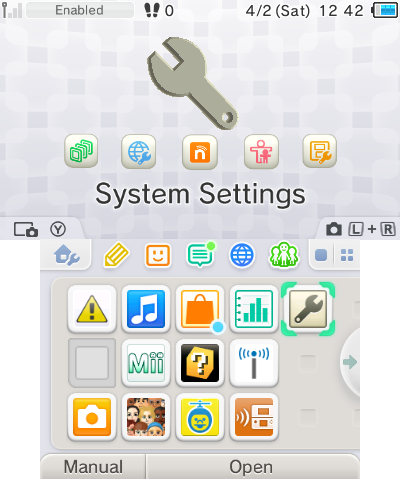
- Hover over the System Settings icon using the D-Pad (do not select it yet)
- Power off, then power on your console
- Press (A) to launch System Settings
- Navigate to
Data Management->Nintendo 3DS->Extra Data(image) - Do not press any buttons or touch the screen
- With the console STILL ON, and without pressing any buttons or touching the screen, remove your SD card from your console
- The menu will refresh and say that no SD card is inserted, which is expected
- Stecke deine SD-Karte in deinen Computer
- Run the MSET9 script:
- Windows: Double-click
mset9.bat - macOS: Double-click
mset9.commandand enter your password if prompted - Linux: open a Terminal window,
cdto the root of your SD card, then typepython3 mset9.pyand press Enter
- Windows: Double-click
- Type the number corresponding to your console model and version, then press Enter
- In the MSET9 window, type
2, then press Enter to inject MSET9- You should see “MSET9 successfully injected!”
- Press Enter to close the MSET9 script
- Reinsert your SD card into your console without pressing any buttons or touching the screen
- Wenn der Exploit erfolgreich war, wird SafeBS9Installer gestartet
- If you get a red screen or the console gets stuck on a loading screen, follow the troubleshooting guide
Schritt III - boot9strap installieren
In this section, you will install custom firmware onto your console.
- Wenn du gebeten wirst, eine Tastenkombination einzugeben, gib die Tastenkombination auf dem oberen Bildschirm ein, um boot9strap zu installieren
- If a step on the lower screen has red-colored text, and you are not prompted to input a key combo, follow this troubleshooting guide
- Once it is complete, press (A) to reboot your console
- Deine Konsole sollte in das Luma3DS Konfigurations-Menü gestartet haben
- Das Luma3DS Konfigurations-Menü enthält Einstellungen für die Luma3DS Custom Firmware. Viele dieser Einstellungen können nützlich für Personalisierung oder Debugging sein
- Für den Zweck dieser Anleitung lasse alle Optionen auf ihren Standardeinstellungen (aktiviere oder deaktiviere nichts)
- Wenn sich deine Konsole beim Starten direkt wieder ausschaltet, solltest du sicherstellen, dass du
boot.firmaus der Luma3DSzipDatei in das Stammverzeichnis deiner SD-Karte kopiert hast
- Drücke (Start) um zu Speichern und neu zu starten
Section IV - Removing MSET9
In this section, you will remove MSET9 to prevent further issues. (This will not remove the custom firmware that you just installed.)
Do NOT skip this section! If you skip it, applications may crash unexpectedly and you will encounter errors on the next page!
- Power off your console
- Stecke deine SD-Karte in deinen Computer
- Run the MSET9 script:
- Windows: Double-click
mset9.bat - macOS: Double-click
mset9.commandand enter your password if prompted - Linux: open a Terminal window,
cdto the root of your SD card, then typepython3 mset9.pyand press Enter
- Windows: Double-click
- Type the number corresponding to your console model and version, then press Enter
- In the MSET9 window, type
3, then press Enter to remove MSET9- You should see “Successfully removed MSET9!”
- Press Enter to close the MSET9 script
Ab diesem Punkt wird deine Konsole standardmäßig Luma3DS starten.
- Luma3DS sieht nicht anders aus als das normale HOME-Menü. Wenn deine Konsole in das HOME-Menü gestartet ist, läuft Custom Firmware auf ihr.
- Auf der nächsten Seite wirst du nützliche Homebrew Apps installieren, um die Installation abzuschließen.
Did you follow Section IV (Removing MSET9)? That section is MANDATORY!