问题排查
此页面列出了一些常见问题的解决办法。 如果你的问题无法通过此页面提供的方法解决,请加入 Nintendo Homebrew Discord 服务器,使用英文描述你的问题(包括你尝试过的操作)来寻求帮助。你也可以到译者的 QQ 群寻求帮助,群号为 942052497。
Table of Contents
Used on multiple pages:
Guide pages:
- Installing boot9strap (Soundhax)
- Installing boot9strap (MSET9)
- Installing boot9strap (SSLoth-Browser)
- Installing boot9strap (super-skaterhax)
- Finalizing Setup
Issues after installation:
关于 SafeB9SInstaller 的问题
Before opening SafeB9SInstaller
Failed to open SafeB9SInstaller.bin
SafeB9SInstaller.bin 文件丢失或放置在了错误的位置。 下载最新版本的 SafeB9SInstaller 然后解压它,将 SafeB9SInstaller.bin 放在你 SD 卡的根目录中。 如果你下到的东西看不到 .bin 后缀,请不要重命名它。
SigHaxed FIRM was not installed! Check lower screen for more info.
MicroSD Card - init failed
Your SD card is most likely acting weird. Try reformatting your SD card (Windows, macOS, Linux). If this doesn’t work, try another SD card.
SigHaxed FIRM - File not found
你忘记把 boot9strap.firm 和 boot9strap.firm.sha 放进 SD 卡根目录的 boot9strap 文件夹了,或是创建 boot9strap 文件夹的时候打错了名字。 下载最新版本的 boot9strap,然后将 boot9strap.firm 和 boot9strap.firm.sha 放入 boot9strap 文件夹。
SigHaxed FIRM - invalid FIRM
你的 boot9strap.firm 和 boot9strap.firm.sha 文件有问题。 重新下载最新版本的 boot9strap,然后将 boot9strap.firm 和 boot9strap.firm.sha 放入 boot9strap 文件夹。
Secret Sector - File not found
你忘记把 secret_sector.bin 放进 SD 卡根目录的 boot9strap 文件夹了,或是创建 boot9strap 文件夹的时候打错了名字。 使用 BT 客户端下载 secret_sector.bin,然后把它放到 SD 卡里的 boot9strap 文件夹中。
Something else
如需帮助,请加入 Nintendo Homebrew Discord 服务器,使用英文描述你看到的信息。你也可以到译者的 QQ 群寻求帮助,群号为 942052497。
安装 boot9strap(通过 Soundhax)
Red/purple/pink and white screen after running Soundhax
If your console is on system version 9.4.0, 9.5.0, or 9.6.0, you may be encountering a bug with an old version of universal-otherapp. Download the latest version from here.
If your console is not on those firmwares, it likely indicates that you already have custom firmware. 你应该检查一下。
"An error has occurred, forcing the software to close..." (white message box)
你放的 otherapp.bin 文件有问题(丢失、放错位置或者损坏)。 下载最新版本的 universal-otherapp 并将其放在你 SD 卡的根目录中。
"Could not play"
You have the wrong Soundhax file for your console and region, or your console is incompatible with Soundhax. In the latter case, your course of action will determine on what version your 3DS is currently on. 如需帮助,请加入 Nintendo Homebrew Discord 服务器。
Failed to mount the SD card!
备份好你 SD 卡上的文件,然后根据你的操作系统选择一个工具来重新格式化 SD 卡为 FAT32 格式:Windows、macOS、Linux。 目前已知 MiniTool Partition Wizard 和惠普格式化工具(HPUSBDisk)格出来的 SD 卡给 3DS 使用会出问题。
如果还是不行,尝试换一张 SD 卡。
Installing boot9strap (MSET9)
Python 3 is not installed
Python is not installed on the computer you are using. Download it from the Python website, double-click the installer, and follow the prompts to install Python. Once Python is installed, try again.
Error 01: Couldn't find Nintendo 3DS folder
You are not running MSET9 from the root of the SD card, or the SD card is missing the Nintendo 3DS folder.
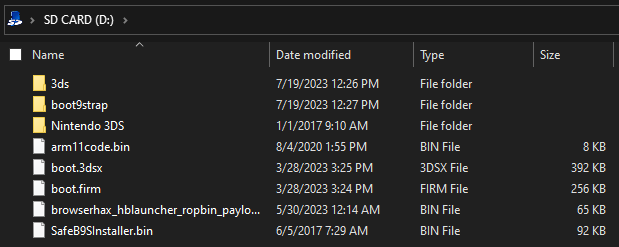
Remember, your SD card should look like this:
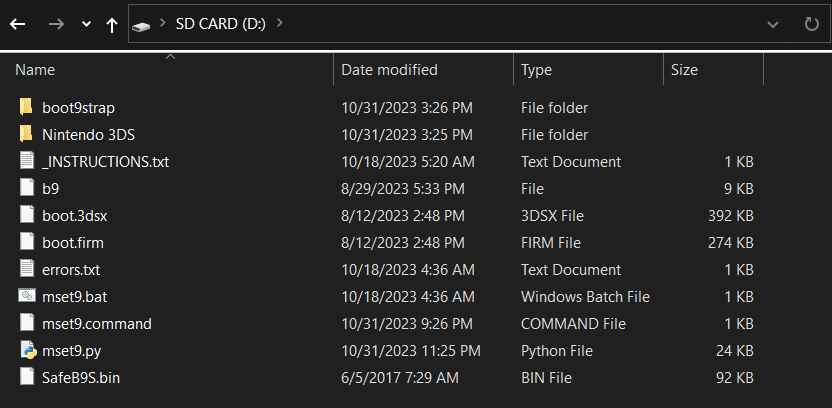
If your SD card layout is correct, then your SD card most likely isn’t being read by your console. Re-format it (Windows, Linux, macOS), then start again from the beginning of Section I.
Error 02: Your SD is write protected
Write-protection is enabled on this SD card. If you are using a full-size SD card, ensure that the lock is flipped in the upright position. Otherwise, try ejecting and reinserting your SD card.
Error 03: Don't change console version
You inputted a different number between different runs of MSET9 (for example, you initially selected option 1 for “Old 3DS, 11.8 - 11.17” and then later selected option 2 for “New 3DS, 11.8 - 11.17”).
If this happened when trying to uninstall MSET9, the script has automatically removed MSET9 for you and you can continue to the next page. Otherwise, start again from the beginning of Section I.
Error 04: No HOME Menu Extdata.
Your SD card is not formatted properly.
Copy everything off the SD Card to your PC, re-format it (Windows, Linux, macOS), copy everything back, then start again from the beginning of Section I.
Error 05: No Mii Maker Data!
Mii Maker data was not found on the SD card. Start again from the beginning of Section I.
Error 06: You need at least 16MB free
Your SD card does not have enough space to trigger MSET9. Free up some space and try again.
At the end of this guide, you will need at least 1.3GB to make a NAND backup, so it’s best to free up at least that much.
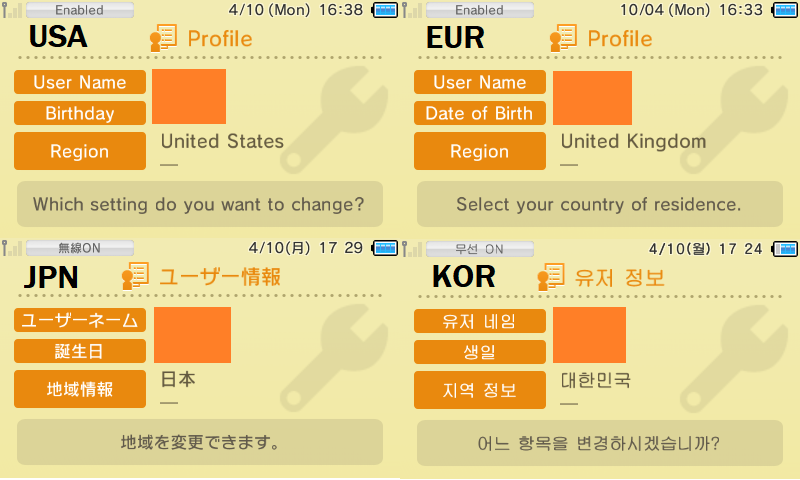
Error 07: You don't have 1 ID0, you have (#)!
You have multiple ID0 folders. To determine the correct folder, follow these instructions:
- 将
Nintendo 3DS文件夹重命名为BACKUP_Nintendo 3DS - Reinsert your SD card into your console
- Power on your console
- Wait for the console to generate the SD card data
- 你先前安装的程序会暂时消失。 这是正常的,且接下来就会还原回来。
- 将主机关机
- 将你的 SD 卡插入到电脑
- 打开你 SD 卡的
Nintendo 3DS文件夹 - Write down the first few characters of the folder you see
- This is your true ID0, which we will keep in the real Nintendo 3DS folder
- Delete the ID0 from the current
Nintendo 3DSfolder - Move the true ID0 folder from the
BACKUP_Nintendo 3DSfolder to theNintendo 3DSfolder - If it exists, move the
Privatefolder from theBACKUP_Nintendo 3DSfolder to theNintendo 3DSfolder
Once you’ve done this, continue from Section I Step 7.
Error 08: One or more files are missing or malformed!
One or more files that MSET9 needs to run is missing or corrupted. Re-download the MSET9 Release .zip and extract it to the root of your SD card, replacing all existing files, then try again.
Error 10: Database(s) malformed or missing!
This happens when no valid title database is present, usually because you never installed any titles from eShop on this SD card.
- If you haven’t already, press Enter to close the MSET9 script
- Insert the SD card into your console
- Power on your console
- Navigate to System Settings -> Data Management -> Nintendo 3DS -> Software -> Reset (visual instructions)
- 将主机关机
- Insert the SD card into your computer
- Return to Section I Step 7
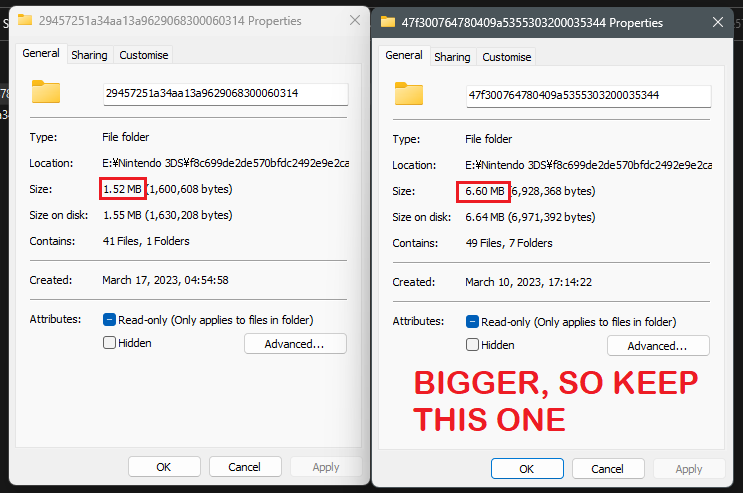
Error 12: You don't have 1 ID1, you have (#)!
This occurs when you use multiple SD cards with the same 3DS and then merge the SD card contents together. Both are “valid”, but the 3DS can only read one at a time.
You will need to determine which one contains your data. First of all, back up all of the folders, in case something goes wrong:
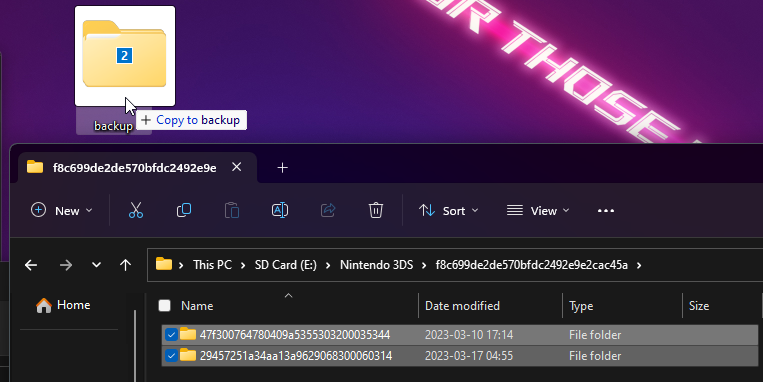
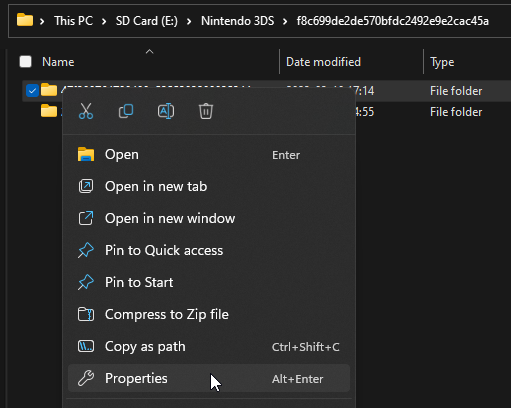
Now, delete all but one of the folders from your SD card. Generally, you will want to delete the smallest one(s), as the one with all your data will probably have more space occupied. You can compare which folder is occupying more space by right-clicking it and clicking “Properties”:
Your SD card should now look something like this:
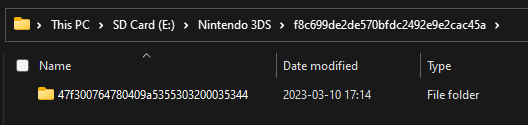
Now, put your SD card into your 3DS and turn it on. If your data is still there, you deleted the right folder and have now determined your correct ID1. If everything has disappeared, go back into the backup folder that you made earlier and try the other folder.
Red screen after reinserting SD card (Section II Step 11)
You may be missing SafeB9S.bin from the root of your SD card, or the file may be corrupted. Copy it from the MSET9 .zip, replacing any existing files.
Alternatively, your SD card may be improperly formatted or partitioned. Try reformatting your SD card: Windows, Linux, macOS (this will wipe your SD card data)
System Settings loading infinitely after reinserting the SD card
You most likely did something different from the MSET9 instructions, or selected the wrong model or version.
- Close the script window
- Execute the
mset9.pyscript on the root of the SD card- Windows: Double-click
mset9.bat - Linux: open a Terminal window,
cdto the root of your SD card, then typepython3 mset9.pyand press Enter - You should see a window that says “MSET9 … SETUP by zoogie”
- Windows: Double-click
- Type the number corresponding to your console model and version, then press Enter
- Type
3, then press Enter - Once the window says “Successfully removed MSET9!”, reinsert the SD card into your console
- Power on your console
- Return to Section II Step 1
If you continue to have this issue and are sure that you did everything correctly, it’s possible that there’s something wrong with your Mii Maker extdata. Follow these instructions to reset it:
- Close the script window
- Run the MSET9 script
- Windows: Double-click
mset9.bat - Linux: open a Terminal window,
cdto the root of your SD card, then typepython3 mset9.pyand press Enter - You should see a window that says “MSET9 … SETUP by zoogie”
- Windows: Double-click
- Type the number corresponding to your console model and version, then press Enter
- Type
3, then press Enter to remove MSET9 - If possible, use a new SD card; otherwise, backup and reformat your existing SD card as FAT32 (Windows, Linux, macOS)
- Insert the formatted, blank SD card into your console
- Return to Section I Step 1
After finishing the MSET9 page, you should switch back to your old SD card before continuing to Finalizing Setup.
An exception occured after triggering MSET9
这可能代表着你的主机已经安装过了自制固件。 你应该检查一下。
Installing boot9strap (super-skaterhax)
"An error has occurred. Please save your data in any software currently in use, then restart the system."
The date is set incorrectly. To set it correctly, follow these steps:
- Select the System Settings icon on the HOME Menu, and tap Open.
- Tap Other Settings.
- Tap Date & Time.
- Tap Today’s date.
- Tap Up/Down Arrows to set the correct Day, Month and Year.
- Select OK to confirm.
If the problem persists:
- Ensure that
arm11code.bin,browserhax_hblauncher_ropbin_payload.bin, andboot.3dsxare on the root of the SD card (not inside of any folder) - Ensure that you selected the correct payload for your region AND system version
- Ensure that your region settings look like this
- Try resetting your browser data:
- 打开浏览器,进入浏览器设置页面
- Scroll to the bottom and select “Reset Save Data” (it may also be called “Initilize Save Data” or “Clear All Save Data”)
- 再次尝试触发漏洞
- Try changing the system language to something other than the current language
"An error has occurred. Hold down the POWER button to turn off the power..." (black screen with text)
arm11code.bin 文件丢失或位置错误。 Make sure to copy the files of the latest version of super-skaterhax for your region and version to the root of your SD card (not inside of a folder).
An exception occured or "DLL_HEAP_INFORMATION" when pressing GO! GO!
这可能代表着你的主机已经安装过了自制固件。 你应该检查一下。
安装 boot9strap(通过 SSLoth-Browser)
Red/purple/pink and white screen after running Browserhax
这可能代表着你的主机已经安装过了自制固件。 你应该检查一下。
"An error has occurred. Hold down the POWER button to turn off the power..." (black screen with text)
arm11code.bin 文件丢失或位置错误。 下载最新版本的 universal-otherapp 并将其放在你 SD 卡的根目录中,然后重命名为 arm11code.bin。 如果你下到的东西看不到 .bin 后缀,请不要重命名它。
"An error has occurred, forcing the software to close..." (white message box)
这可能说明你放的 arm11code.bin 文件有问题。 下载最新版本的 universal-otherapp 并将其放在你 SD 卡的根目录中,然后重命名为 arm11code.bin。 如果你下到的东西看不到 .bin 后缀,请不要重命名它。
You can also try resetting your browser save data:
- 打开浏览器,进入浏览器设置页面
- Scroll to the bottom and select “Reset Save Data” (it may also be called “Initialize Save Data” or “Clear All Save Data”)
- 再次尝试触发漏洞
Opening the browserhax QR code or URL crashes
基于浏览器的破解漏洞(例如你正在使用的这个)不稳定并经常崩溃,你可以尝试按照下面的步骤修复:
- 打开浏览器,进入浏览器设置页面
- Scroll to the bottom and select “Reset Save Data” (it may also be called “Initialize Save Data” or “Clear All Save Data”)
- 再次尝试触发漏洞
System Update prompt when opening browser
你可能没有正确配置 SSLoth 代理服务器。 尝试重做页面上的 SSLoth 部分内容。
Error 032-0420 when opening browser
按照以下步骤操作:
- Launch System Settings on your console
- 进入到
互联网设置(インターネット設定 / Internet Settings)->连接设置(インターネット接続設定 / Connection Settings) - 点击你目前在用的连接点槽位,然后进入到
设置变更(設定変更 / Change Settings)->下一页(右箭头)->代理设置(Proxy) - 将 “代理设置(Proxy)”设置为 “否(No/しない)”
- 点击 OK,然后点击保存(保存する / Save)
- 当提示时,点击“测试(テスト / Test)”进行连接测试
- 测试应该会成功
- 点击 “OK” 继续
- 点两次 “返回”,然后点“关闭”来返回主菜单。
- 打开浏览器
- 如果它提示需要系统更新,点击 OK
- 这实际不会将系统更新
- 重新从第二步开始
Frozen on "Doing agbhax..."
这可能说明你放的 arm11code.bin 文件有问题。 重新下载最新版本的 universal-otherapp 并将其放在你 SD 卡的根目录中,然后重命名为 arm11code.bin。 如果你下到的东西看不到 .bin 后缀,请不要重命名它。
"PrepareArm9ForTwl returned error c8804631!"
如需帮助,请加入 Nintendo Homebrew Discord 服务器。
Failed to mount the SD card!
备份好你 SD 卡上的文件,然后根据你的操作系统选择一个工具来重新格式化 SD 卡为 FAT32 格式:Windows、macOS、Linux。 目前已知 MiniTool Partition Wizard 和惠普格式化工具(HPUSBDisk)格出来的 SD 卡给 3DS 使用会出问题。
如果还是不行,尝试换一张 SD 卡。
完成安装
Unable to update console
以下是可以尝试的解决方法,按从简单到困难的顺序排列。
- 将 DNS 设置为“自动(Auto)”
- 将主机靠近 WiFi 路由器
- 尝试在安全模式下更新主机,在开机时按住 L + R +↑ + A 键来进入安全模式,然后跟随屏幕上的指示做
- 删除你的 Wifi 连接点然后重新再设置一次
- 重启你的 WiFi 路由器
- 连接其他的 WiFi,比如移动热点
- Nintendo 服务器可能临时下线,稍后再试
- 如果仍然提示错误,请进行 CTRTransfer,然后再尝试一次更新
- 如需援助,请加入 Nintendo Homebrew Discord 服务器并说英文求助。(请注意,如果你身处中国大陆,访问 Discord 可能需要科学上网),你也可以到译者的 QQ 群寻求帮助,群号为 942052497。
Error #22: finalize.romfs is invalid
The file finalize.romfs is corrupt or unreadable. Re-download it and copy it to the root of the SD card, replacing any existing copy, then try again.
Information #23: finalize.romfs in wrong location
The file finalize.romfs was placed in the wrong location instead of root of SD. The script will attempt to resolve this, but requires your permission to do so. Press (A) on the next few prompts to continue.
Error #24: SD is write-protected
Ensure that your SD card is not locked. If the SD card is not locked and you continue to get this error, join Nintendo Homebrew on Discord for assistance.
Error #02: Missing essential.exefs
You said ‘No’ to the “Make essential files backup?” prompt in GodMode9. Power off your console, power it on while holding (Start) to re-enter GodMode9, say ‘Yes’ to the prompt, then try again.
Error #04: No space
You need at least 1.3GB of free space to perform the NAND backup, which is a part of the script. If you don’t have enough space, follow these steps:
- 将主机关机
- 将你的 SD 卡插入到电脑
- Copy the
Nintendo 3DSfolder from the root of your SD card to your computer - Delete the Nintendo 3DS folder from the SD card
- Reinsert your SD card into your console
- Press and hold (Start), and while holding (Start), power on your console. This will launch GodMode9
- Press the (Home) button
- 选择 “Scripts…”
- Select “finalize”
- Press (A) to create a NAND backup
- This may take around fifteen minutes
- Press (A) again
- The console should automatically power off
- 将你的 SD 卡插入到电脑
- Copy the files in
/gm9/backups/on your SD to a safe location on your computer - Delete the
<date>_<serialnumber>_sysnand_##.binand<date>_<serialnumber>_sysnand_##.bin.shafiles from the SD card - Copy the
Nintendo 3DSfolder from your computer to the root of your SD card - Delete the
Nintendo 3DSfolder from your computer
Now that you have your NAND backup in a safe place:
- Reinsert your SD card into your console
- Press and hold (Start), and while holding (Start), power on your console. This will launch GodMode9
- Press the (Home) button
- 选择 “Scripts…”
- Select “finalize”
- Continue the script as normal
- The NAND backup will be automatically skipped
Information #05: No title database
Press (A) to import a title database, unlock SysNAND writing by entering the buttons on-screen, then continue the script as normal.
Error #06 or "Error: Could not open directory" when attempting a NAND backup
Make sure you have at least 1.3GB available in your SD card. If you don’t have enough space, follow these steps:
- 将主机关机
- 将你的 SD 卡插入到电脑
- Copy the
Nintendo 3DSfolder from the root of your SD card to your computer - Delete the Nintendo 3DS folder from the SD card
- Reinsert your SD card into your console
- Press and hold (Start), and while holding (Start), power on your console. This will launch GodMode9
- Perform a NAND Backup
- Copy the files in
gm9/outon your SD to a safe location on your computer - Delete the
<date>_<serialnumber>_sysnand_##.binand<date>_<serialnumber>_sysnand_##.bin.shafiles from the SD card, keeping essential.exefs in/gm9/out/ - Copy the
Nintendo 3DSfolder from your computer to the root of your SD card - Delete the
Nintendo 3DSfolder from your computer
If you have enough space on your SD card, your SD might be corrupted or faulty. Check your SD card for any errors by following the guide according to your computer’s operating system: Windows, Linux, macOS.
Error #12: Copy (file).db fail
Ensure that your SD card is not locked. If the SD card is not locked and you continue to get this error, join Nintendo Homebrew on Discord for assistance.
Information #17: Duplicate NAND backup
The script has detected that the Nintendo 3DS folder is missing AND that you have already made a NAND backup before. If you intend to install homebrew applications, you should do the following:
- Press (B) to cancel making another NAND backup
- Hold (R) and press (Start) at the same time to power off your console
- Copy the contents of
/gm9/backups/to a safe location on your computer - Delete
/gm9/backups/from your SD card - If you moved your Nintendo 3DS folder off of your SD card to get to this point, copy it back to your SD card
- If you do not have a Nintendo 3DS folder, boot into the HOME Menu at least once with the SD card inserted to automatically generate it
- Press and hold (Start), and while holding (Start), power on your console. This will launch GodMode9
- 按下 “Home” 键来打开功能菜单
- 选择 “Scripts…”
- Select “finalize”
- Follow the prompts in the script, answering any questions that you are asked
Error #18a/18b: MSET9 detected
You didn’t remove MSET9 on the previous page. The script will attempt to remove MSET9 for you; follow the instructions given by the script.
Boot issues on consoles with custom firmware
The steps detailed here generally assume that your console has a modern custom firmware setup (boot9strap + Luma3DS 8.0 or greater). 如果你的主机还在用旧版的自制固件(例如基于 arm9loaderhax 或 menuhax 的东西),则你应该在继续操作前先升级自制固件。
Power/notification light indicators
My console powers off when I try to turn it on, and/or the notification LED shows a color on boot
这说明你放的 boot.firm 文件有问题。 如果你的主机正在使用 boot9strap 1.4 版,那么你的主机在这种情况下开机后,通知灯就会亮起某种特定的颜色,然后关机。 具体亮起的颜色可用来判断你内存卡或主机内存中的 boot.firm 的问题。 On older versions of boot9strap, the blue light will power off almost immediately when trying to turn on the console.
如果通知灯亮起:
- White: Your 3DS was not able to find
boot.firmon your SD card or on internal memory. - Magenta: Your 3DS was not able to find
boot.firmon your SD card. 主机内存中可以找到boot.firm文件,但是文件已损坏。 - Red: Your 3DS was able to find
boot.firmon both your SD card and on internal memory, but both files are corrupted.
你可以通过下载 最新版本的 Luma3DS,然后解压,将 boot.firm 复制到 SD 卡的根目录。 如果 boot.firm 始终被主机判定为损坏,则你可能需要使用一个工具来测试一下你的 SD 卡(Windows、Linux、macOS) 另外,最好不要使用 WinRAR 解压文件,解压的文件给 3DS 使用可能会出问题。
If you hear a “popping sound”, potentially accompanied with the backlight turning on for a split second, there is a hardware issue with your console (such as a disconnected backlight cable). You may be able to get your console to boot by holding it at certain angles.
My console gets stuck on a black screen with blue power light staying on
你可以把下面所列出的方法都试试,此处将方法从最省时到最耗时的顺序排列。
- Power off your console, remove the SD card, re-insert it, then power on your console.
- Power off your console, eject the game cartridge if inserted, power on your console, then wait up to ten minutes. If your console boots within ten minutes, the issue has been fixed and is unlikely to reoccur
- 将 SD 卡上的
Nintendo 3DS文件夹重命名为Nintendo 3DS_BACKUP,然后尝试启动主机。 If your console successfully boots, there is some issue within yourNintendo 3DSfolder. 尝试清理主菜单的外部存储文件:- 进入到
/Nintendo 3DS/<ID0>/<ID1>/extdata/00000000/ - 删除对应你的 3DS 区域的文件夹:
- 欧版:
00000098 - 日版:
00000082 - 美版:
000008f - 中国版(神游版):
000000A1 - 韩版:
000000A9 - 台湾版:
000000B1
- 欧版:
- 进入到
- 尝试启动到恢复模式并升级系统:
- Power off your console
- 按住 “L” + “R” + “↑” + “A” 四个键
- Power on your console
- If you were successful, the console will boot to an “update your system” screen
- 尝试做 CTRTransfer
- 如需援助,请加入 Nintendo Homebrew Discord 服务器并使用英文求助。(请注意,如果你身处中国大陆,访问 Discord 可能需要科学上网),你也可以到译者的 QQ 群 寻求帮助,群号为 942052497。
Error message on boot
"An error has occurred: Failed to apply 1 FIRM patch(es)" or "An exception has occurred -- Current process: pm"
你主机的 Luma3DS 版本已过时。 下载最新版本的 Luma3DS 并将 boot.firm 放在你 SD 卡的根目录中,如有存在相同文件请替换。 请不要用 WinRAR 解压 ZIP 文件,我们目前已知这会导致与 3DS 有关的文件出错。
"Unable to mount CTRNAND or load the CTRNAND FIRM. Please use an external one."
There are a number of reasons as to why this could be happening. In any case, this error can usually be fixed by following the CTRTransfer guide.
"An error has occurred. Hold down the POWER button to turn off the power..."
ARM11 异常处理器已被禁用,或主机未安装自制固件。 尝试启用 ARM11 异常处理器: + Power off your console + 按住 “Select” 键 + Power on your console, while still holding (Select) + 如果 “ARM11 exception handlers disabled” 已被勾选,则请取消勾选它
HOME Menu is missing installed applications
This could be caused by various reasons, but most likely because your SD card is not being read by the system. You can check if your SD is being read by holding SELECT on boot and checking the yellow text on the bottom screen; if it says “Booted from CTRNAND via B9S”, then your console is booting from the internal memory and not from the SD card. If this is the case, attempt the steps below, which are listed from easiest to hardest:
- Power off your console, remove the SD card, re-insert it, then power on your console
- Power off your console, remove the SD card, insert it on your computer, download the latest release of Luma3DS, extract
boot.firmfrom theLuma3DS.zipand place it on the root of your SD card (replacing any existing file) - Power off your console, remove the SD card, insert it on your computer and reformat your SD card according to your computer’s operating system: Windows, macOS, Linux (this will wipe your SD card data)
- Test your SD card for errors by following the guide according to your computer’s operating system: Windows, Linux, macOS. If your SD card is marked as faulty, then you will have to replace your SD card
- Your SD card slot may be broken. Join Nintendo Homebrew on Discord for further assistance
Blue "BOOTROM ERROR" screen
Your console is likely hard-bricked. You will need to buy an ntrboot flashcart to reinstall boot9strap in order to attempt to fix your console. 这也可能是无法修复的硬件问题。 无论如何,请先加入 Nintendo Homebrew Discord 服务器 并说英文求助。(请注意,如果你身处中国大陆,访问 Discord 可能需要科学上网),你也可以到译者的 QQ 群寻求帮助,群号为 942052497。 + 还有可能有人设了一个看上去就像变砖了的开机画面。 Try leaving your console powered on, waiting on the blue screen, for five minutes.
Some other error
请对报错拍照,然后加入 Nintendo Homebrew Discord 服务器并说英文以获取援助。(请注意,如果你身处中国大陆,访问 Discord 可能需要科学上网),你也可以到译者的 QQ 群寻求帮助,群号为 942052497。
Software issues on consoles with custom firmware
DSi / DS functionality is broken or has been replaced with Flipnote Studio
- 下载最新版本的 TWLFix-CFW (下载
.3dsx文件) - 将主机关机
- 检查 SD 卡的根目录是否存在一个名为
3ds的文件夹,如果没有则手动新建一个 - 复制
TWLFix-CFW.3dsx到你内存卡的/3ds/文件夹 - Reinsert your SD card into your console
- 启动 Homebrew Launcher
- 在自制程序列表中找到 TWLFix-CFW
- 按下 “A” 键来卸载损坏的 TWL 程序
- Press (Start) to reboot the console
- Update your console by going to System Settings, then “Other Settings”, then going all the way to the right and using “System Update”
- 更新程序将检查到你主机基本的 TWL 程序被卸载,然后它将重新安装它们
- Once the update is complete, tap “OK” to reboot the console
GBA Virtual Console and/or Safe Mode functionality is broken
Your console is running Luma3DS 6.6 or older, likely via arm9loaderhax. You should follow A9LH to B9S to update your console to a modern custom firmware environment.
Extended memory mode games (Pokemon Sun/Moon, Smash, etc.) don't work
旧版 3DS / 2DS 在做完 CTRTransfer 或区域变更之后可能会出现这个问题。 Follow the instructions here to fix this issue (skipping steps 3, 4, 5, and 6).
Exception screen when booting/loading an application
Look for your exception screen in this page. If you weren’t able to find your error or the instructions didn’t work, join Nintendo Homebrew on Discord for further assistance.
Opening the HOME Menu settings crashes the console or loads the Homebrew Launcher
Your console likely still has menuhax67 installed. To uninstall menuhax67, download the latest release of menuhax67 (the menuhax .zip), then follow the “Uninstall menuhax67” section here.
其他问题
Clear HOME Menu extdata
- 将主机关机
- 将你的 SD 卡插入到电脑
- 打开你 SD 卡的
/Nintendo 3DS/<ID0>/<ID1>/extdata/00000000/文件夹 - 删除对应你的 3DS 区域的文件夹:
- 欧版:
00000098 - 日版:
00000082 - 美版:
000008f - 中国版(神游版):
000000A1 - 韩版:
000000A9 - 台湾版:
000000B1
- 欧版:
- Reinsert your SD card into your console
Clear HOME Menu theme data
- 将主机关机
- 将你的 SD 卡插入到电脑
- 打开你 SD 卡的
/Nintendo 3DS/<ID0>/<ID1>/extdata/00000000/文件夹 - 删除对应你的 3DS 区域的文件夹:
- 欧版:
000002ce - 日版:
000002cc - 美版:
000002cd
- 欧版:
- Reinsert your SD card into your console
Manually entering Homebrew Launcher
If you are missing the Homebrew Launcher application from your HOME Menu, you can follow these instructions to manually enter the Homebrew Launcher. (You will need boot.3dsx and boot.firm on the root of your SD card.)
- 启动“下载通信(Download Play)”程序 (
 )
) - 等到你看到
Nintendo 3DS和Nintendo DS按钮 - 同时按下 “L” + “↓” + “Select” 键来打开 Rosalina 菜单
- 选择 “Miscellaneous options”
- 选择 “Switch the hb. title to the current app.”
- 按 “B” 键继续
- 按 “B” 键返回 Rosalina 主菜单
- 按 “B” 键退出 Rosalina 菜单
- Press (Home) to suspend Download Play
- Press the “Close” button on the bottom screen to close Download Play
- Re-launch the Download Play application
- Your console should load the Homebrew Launcher
- If your console is stuck on the loading splash screen, you are missing
boot.3dsxfrom the root of your SD card
- If your console is stuck on the loading splash screen, you are missing
Turning off Parental Controls
You can disable the Parental Controls feature by going to System Settings -> Parental Controls and inserting the PIN, then pressing “Clear Settings”, then “Delete” to remove it. However, if you do not know the PIN and therefore cannot access the console’s settings, you will need to disable it. In order to do this, you need to obtain your console’s master key (mkey):
- Go to this website
- Fill the following boxes with the information:
- Device Type: Select “3DS” (the same applies if you are using a 2DS, New 3DS (XL/LL) or New 2DS (XL/LL))
- System Date: The day and month your console’s clock is set to
- Inquiry Number: Can be obtained by pressing “Forgot PIN” then “I Forgot” in the Parental Controls screen
- After you have obtained your mkey, press OK on the screen you have obtained your Inquiry Number, then input the master key
- Press “Clear Settings”, then “Delete” to remove all Parental Controls data