疑難排解
本頁提供常見問題的疑難解答及建議。 如果您無法透過本頁解決你的問題,請加入 Discord 上的 Nintendo Homebrew 伺服器,並以英文敘述你的問題,以及您已經嘗試過的步驟。
Table of Contents
Used on multiple pages:
Guide pages:
- Installing boot9strap (Soundhax)
- Installing boot9strap (MSET9)
- Installing boot9strap (SSLoth-Browser)
- Installing boot9strap (super-skaterhax)
- Finalizing Setup
Issues after installation:
關於 SafeB9SInstaller 的問題
Before opening SafeB9SInstaller
Failed to open SafeB9SInstaller.bin
SafeB9SInstaller.bin 檔案遺失或放在了錯誤的位置。 Download the latest release of SafeB9SInstaller, extract it, and place SafeB9SInstaller.bin on the root of your SD card. 如果您的電腦沒有顯示 .bin 的副檔名,請勿手動新增。
『SigHaxed FIRM was not installed!』 Check lower screen for more info.
MicroSD Card - init failed
Your SD card is most likely acting weird. Try reformatting your SD card (Windows, macOS, Linux). If this doesn’t work, try another SD card.
SigHaxed FIRM - File not found
你忘記把 boot9strap.firm 和 boot9strap.firm.sha 放進 SD 卡根目錄的 boot9strap 資料夾,或建立 boot9strap 資料夾的時候打錯了名字。 Download the latest release of boot9strap, and place boot9strap.firm and boot9strap.firm.sha in the boot9strap folder.
SigHaxed FIRM - invalid FIRM
你的 boot9strap.firm 和 boot9strap.firm.sha 檔案有問題。 Re-download the latest release of boot9strap, and place boot9strap.firm and boot9strap.firm.sha in the boot9strap folder.
Secret Sector - File not found
你忘記把 secret_sector.bin 放進 SD 卡根目錄的 boot9strap 資料夾了,或是建立 boot9strap 資料夾的時候打錯了名字。 用 BT 下載 secret_sector.bin,並將其放至 boot9strap 資料夾中。
Something else
請在 Discord 上的 Nintendo Homebrew 伺服器以英文尋求協助,並敘述您所看到的錯誤訊息。
安裝 boot9strap (透過 Soundhax)
Red/purple/pink and white screen after running Soundhax
If your console is on system version 9.4.0, 9.5.0, or 9.6.0, you may be encountering a bug with an old version of universal-otherapp. Download the latest version from here.
If your console is not on those firmwares, it likely indicates that you already have custom firmware. 請先檢查是否已安裝自製韌體 。
"An error has occurred, forcing the software to close..." (white message box)
您所使用的 otherapp.bin 檔案有問題(如遺失、放錯位置或者損壞)。 下載最新版本的 universal-otherapp 並將其放在你 SD 卡的根目錄中。
"Could not play"
You have the wrong Soundhax file for your console and region, or your console is incompatible with Soundhax. In the latter case, your course of action will determine on what version your 3DS is currently on. 請加入 Discord 上的 Nintendo Homebrew 頻道尋求幫助。
Failed to mount the SD card!
Back up your data and reformat your SD card as FAT32 with the recommended tool depending on your operating system (Windows, macOS, Linux). MiniTool Partition Wizard and the HP formatting tool (HPUSBDisk) are known to cause issues with 3DS SD cards.
若仍無法正常使用,請試著使用另一張 SD 卡。
Installing boot9strap (MSET9)
Python 3 is not installed
Python is not installed on the computer you are using. Download it from the Python website, double-click the installer, and follow the prompts to install Python. Once Python is installed, try again.
Error 01: Couldn't find Nintendo 3DS folder
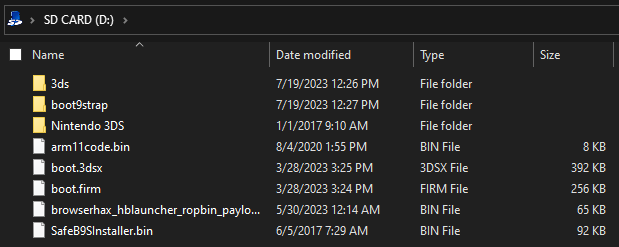
You are not running MSET9 from the root of the SD card, or the SD card is missing the Nintendo 3DS folder.
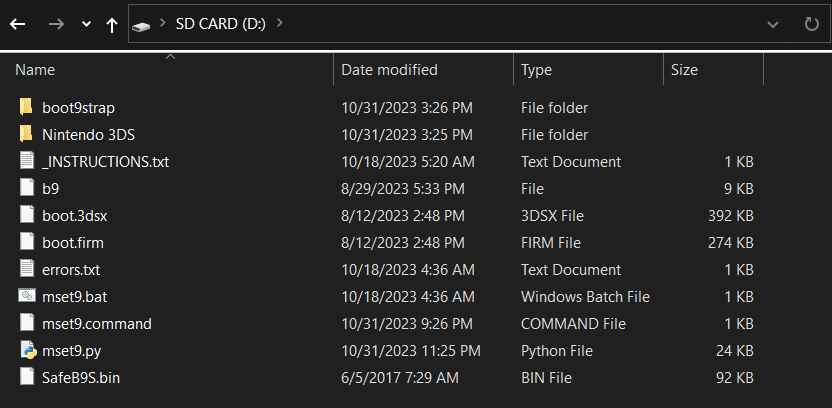
Remember, your SD card should look like this:
If your SD card layout is correct, then your SD card most likely isn’t being read by your console. Re-format it (Windows, Linux, macOS), then start again from the beginning of Section I.
Error 02: Your SD is write protected
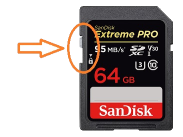
Write-protection is enabled on this SD card. If you are using a full-size SD card, ensure that the lock is flipped in the upright position. Otherwise, try ejecting and reinserting your SD card.
Error 03: Don't change console version
You inputted a different number between different runs of MSET9 (for example, you initially selected option 1 for “Old 3DS, 11.8 - 11.17” and then later selected option 2 for “New 3DS, 11.8 - 11.17”).
If this happened when trying to uninstall MSET9, the script has automatically removed MSET9 for you and you can continue to the next page. Otherwise, start again from the beginning of Section I.
Error 04: No HOME Menu Extdata.
Your SD card is not formatted properly.
Copy everything off the SD Card to your PC, re-format it (Windows, Linux, macOS), copy everything back, then start again from the beginning of Section I.
Error 05: No Mii Maker Data!
Mii Maker data was not found on the SD card. Start again from the beginning of Section I.
Error 06: You need at least 16MB free
Your SD card does not have enough space to trigger MSET9. Free up some space and try again.
At the end of this guide, you will need at least 1.3GB to make a NAND backup, so it’s best to free up at least that much.
Error 07: You don't have 1 ID0, you have (#)!
You have multiple ID0 folders. To determine the correct folder, follow these instructions:
- 將
Nintendo 3DS資料夾重新命名為BACKUP_Nintendo 3DS - Reinsert your SD card into your console
- Power on your console
- Wait for the console to generate the SD card data
- 您先前所安裝的應用程式會暫時消失。 這是正常的,且待會就會恢復正常。
- Power off your console
- 將 SD 卡插入至電腦中
- 移動至 SD 卡的
Nintendo 3DS資料夾中 - Write down the first few characters of the folder you see
- This is your true ID0, which we will keep in the real Nintendo 3DS folder
- Delete the ID0 from the current
Nintendo 3DSfolder - Move the true ID0 folder from the
BACKUP_Nintendo 3DSfolder to theNintendo 3DSfolder - If it exists, move the
Privatefolder from theBACKUP_Nintendo 3DSfolder to theNintendo 3DSfolder
Once you’ve done this, continue from Section I Step 7.
Error 08: One or more files are missing or malformed!
One or more files that MSET9 needs to run is missing or corrupted. Re-download the MSET9 Release .zip and extract it to the root of your SD card, replacing all existing files, then try again.
Error 10: Database(s) malformed or missing!
This happens when no valid title database is present, usually because you never installed any titles from eShop on this SD card.
- If you haven’t already, press Enter to close the MSET9 script
- Insert the SD card into your console
- Power on your console
- Navigate to System Settings -> Data Management -> Nintendo 3DS -> Software -> Reset (visual instructions)
- Power off your console
- Insert the SD card into your computer
- Return to Section I Step 7
Error 12: You don't have 1 ID1, you have (#)!
This occurs when you use multiple SD cards with the same 3DS and then merge the SD card contents together. Both are “valid”, but the 3DS can only read one at a time.
You will need to determine which one contains your data. First of all, back up all of the folders, in case something goes wrong:
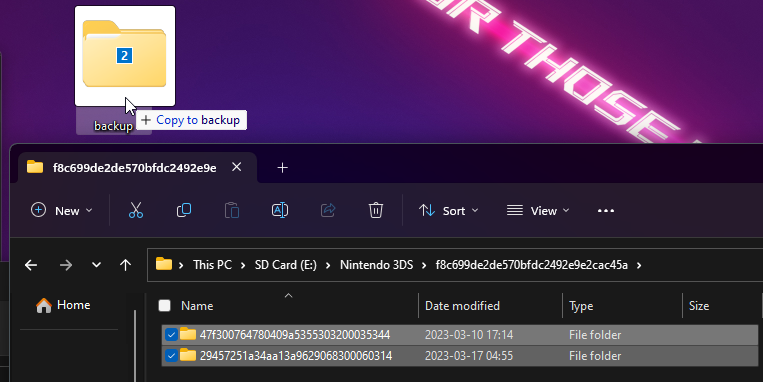
Now, delete all but one of the folders from your SD card. Generally, you will want to delete the smallest one(s), as the one with all your data will probably have more space occupied. You can compare which folder is occupying more space by right-clicking it and clicking “Properties”:
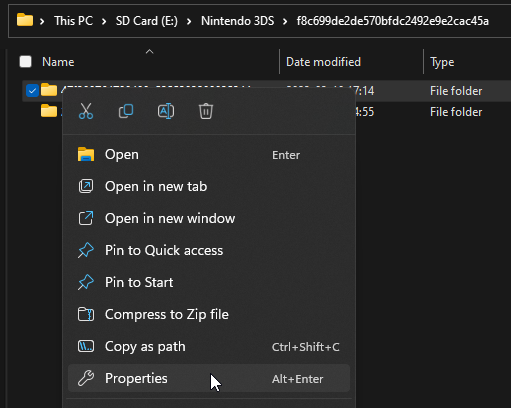
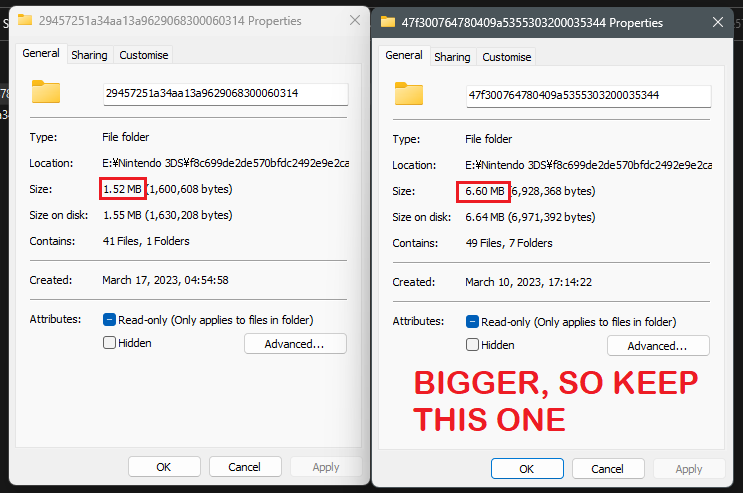
Your SD card should now look something like this:
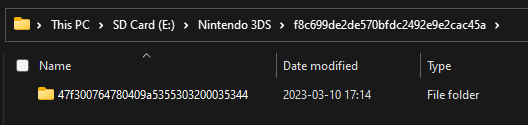
Now, put your SD card into your 3DS and turn it on. If your data is still there, you deleted the right folder and have now determined your correct ID1. If everything has disappeared, go back into the backup folder that you made earlier and try the other folder.
Red screen after reinserting SD card (Section II Step 11)
You may be missing SafeB9S.bin from the root of your SD card, or the file may be corrupted. Copy it from the MSET9 .zip, replacing any existing files.
Alternatively, your SD card may be improperly formatted or partitioned. Try reformatting your SD card: Windows, Linux, macOS (this will wipe your SD card data)
System Settings loading infinitely after reinserting the SD card
You most likely did something different from the MSET9 instructions, or selected the wrong model or version.
- Close the script window
- Execute the
mset9.pyscript on the root of the SD card- Windows: Double-click
mset9.bat - Linux: open a Terminal window,
cdto the root of your SD card, then typepython3 mset9.pyand press Enter - You should see a window that says “MSET9 … SETUP by zoogie”
- Windows: Double-click
- Type the number corresponding to your console model and version, then press Enter
- Type
3, then press Enter - Once the window says “Successfully removed MSET9!”, reinsert the SD card into your console
- Power on your console
- Return to Section II Step 1
If you continue to have this issue and are sure that you did everything correctly, it’s possible that there’s something wrong with your Mii Maker extdata. Follow these instructions to reset it:
- Close the script window
- Run the MSET9 script
- Windows: Double-click
mset9.bat - Linux: open a Terminal window,
cdto the root of your SD card, then typepython3 mset9.pyand press Enter - You should see a window that says “MSET9 … SETUP by zoogie”
- Windows: Double-click
- Type the number corresponding to your console model and version, then press Enter
- Type
3, then press Enter to remove MSET9 - If possible, use a new SD card; otherwise, backup and reformat your existing SD card as FAT32 (Windows, Linux, macOS)
- Insert the formatted, blank SD card into your console
- Return to Section I Step 1
After finishing the MSET9 page, you should switch back to your old SD card before continuing to Finalizing Setup.
An exception occured after triggering MSET9
This likely indicates that you already have custom firmware. 請先檢查是否已安裝自製韌體 。
Installing boot9strap (super-skaterhax)
"An error has occurred. Please save your data in any software currently in use, then restart the system."
The date is set incorrectly. To set it correctly, follow these steps:
- Select the System Settings icon on the HOME Menu, and tap Open.
- Tap Other Settings.
- Tap Date & Time.
- Tap Today’s date.
- Tap Up/Down Arrows to set the correct Day, Month and Year.
- Select OK to confirm.
If the problem persists:
- Ensure that
arm11code.bin,browserhax_hblauncher_ropbin_payload.bin, andboot.3dsxare on the root of the SD card (not inside of any folder) - Ensure that you selected the correct payload for your region AND system version
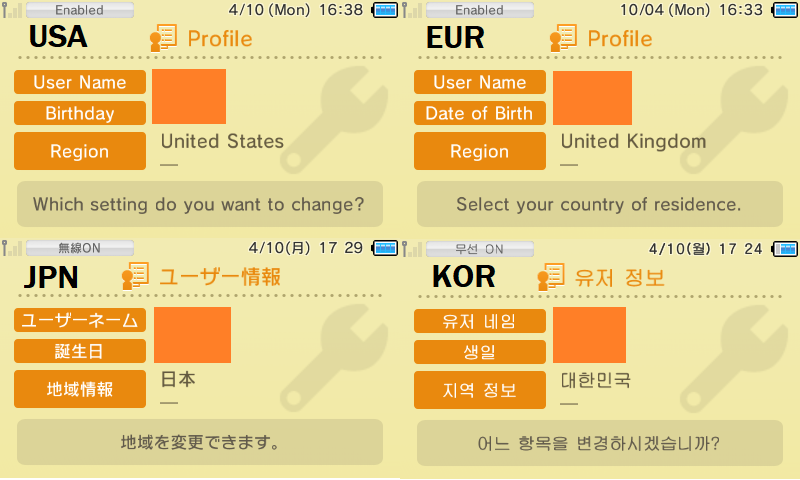
- Ensure that your region settings look like this
- Try resetting your browser data:
- Launch the browser, then launch the browser settings
- Scroll to the bottom and select “Reset Save Data” (it may also be called “Initilize Save Data” or “Clear All Save Data”)
- Try the exploit again
- Try changing the system language to something other than the current language
"An error has occurred. Hold down the POWER button to turn off the power..." (black screen with text)
The file arm11code.bin is missing or misplaced. Make sure to copy the files of the latest version of super-skaterhax for your region and version to the root of your SD card (not inside of a folder).
An exception occured or "DLL_HEAP_INFORMATION" when pressing GO! GO!
This likely indicates that you already have custom firmware. 請先檢查是否已安裝自製韌體 。
安裝 boot9strap (透過 SSLoth-Browser)
Red/purple/pink and white screen after running Browserhax
This likely indicates that you already have custom firmware. 請先檢查是否已安裝自製韌體 。
"An error has occurred. Hold down the POWER button to turn off the power..." (black screen with text)
The file arm11code.bin is missing or misplaced. Download the latest release of universal-otherapp, place otherapp.bin on the root of your SD card and rename it to arm11code.bin. 如果您的電腦沒有顯示 .bin 的副檔名,請勿手動新增。
"An error has occurred, forcing the software to close..." (white message box)
There may be an issue with your arm11code.bin file. Download the latest release of universal-otherapp, place otherapp.bin on the root of your SD card and rename it to arm11code.bin. 如果您的電腦沒有顯示 .bin 的副檔名,請勿手動新增。
You can also try resetting your browser save data:
- Launch the browser, then launch the browser settings
- Scroll to the bottom and select “Reset Save Data” (it may also be called “Initialize Save Data” or “Clear All Save Data”)
- Try the exploit again
Opening the browserhax QR code or URL crashes
Browser based exploits (such as this one) are often unstable and crash frequently, but they can sometimes be fixed by doing the following steps.
- Launch the browser, then launch the browser settings
- Scroll to the bottom and select “Reset Save Data” (it may also be called “Initialize Save Data” or “Clear All Save Data”)
- Try the exploit again
System Update prompt when opening browser
The SSLoth proxy was incorrectly configured. Re-do the SSLoth section on the page.
Error 032-0420 when opening browser
Follow these steps in order:
- Launch System Settings on your console
- Navigate to
Internet Settings->Connection Settings - Click on your network connection slot and navigate to
Change Settings->Next Page (right arrow)->Proxy Settings - Set “Proxy Settings” to “No”
- Click OK, then click Save
- When prompted, click “Test” to perform the connection test
- The test should succeed
- Click “OK” to continue
- Press “Back” twice, then “Close” to go back to the HOME Menu
- Open the Internet Browser once
- If prompted about a system update, press OK
- This won’t actually update the system
- Start again from Section II
Frozen on "Doing agbhax..."
There may be an issue with your arm11code.bin file. Re-download the latest release of universal-otherapp, place it on the root of your SD card, and rename it to arm11code.bin. 如果您的電腦沒有顯示 .bin 的副檔名,請勿手動新增。
"PrepareArm9ForTwl returned error c8804631!"
請加入 Discord 上的 Nintendo Homebrew 頻道尋求幫助。
Failed to mount the SD card!
Back up your data and reformat your SD card as FAT32 with the recommended tool depending on your operating system (Windows, macOS, Linux). MiniTool Partition Wizard and the HP formatting tool (HPUSBDisk) are known to cause issues with 3DS SD cards.
若仍無法正常使用,請試著使用另一張 SD 卡。
完成安裝
Unable to update console
以下是可以嘗試的解決方法,按從簡單到困難的順序排列。
- 將網路設定中的 DNS 位址設定設為『自動 (Auto)』
- 將主機靠近您的 WiFi 路由器
- 開機時按住「L」鍵 +「R」鍵 +「上」鍵 +「A」鍵以開機至安全模式中,並遵循所示指示進行更新
- 將主機中的 WiFi 連線設定清除,並再重新設定一次
- 重新啟動您的 WiFi 路由器
- 試著使用其他 WiFi 連線,比如手機的 WiFi 熱點
- 任天堂伺服器目前可能臨時下線,請稍後再試
- 如果錯誤持續,請進行 CTRTransfer,並再試一次
- 請至 Discord 的 Nintendo Homebrew 伺服器中尋求協助 (英文)。
Error #22: finalize.romfs is invalid
The file finalize.romfs is corrupt or unreadable. Re-download it and copy it to the root of the SD card, replacing any existing copy, then try again.
Information #23: finalize.romfs in wrong location
The file finalize.romfs was placed in the wrong location instead of root of SD. The script will attempt to resolve this, but requires your permission to do so. Press (A) on the next few prompts to continue.
Error #24: SD is write-protected
Ensure that your SD card is not locked. If the SD card is not locked and you continue to get this error, join Nintendo Homebrew on Discord for assistance.
Error #02: Missing essential.exefs
You said ‘No’ to the “Make essential files backup?” prompt in GodMode9. Power off your console, power it on while holding (Start) to re-enter GodMode9, say ‘Yes’ to the prompt, then try again.
Error #04: No space
You need at least 1.3GB of free space to perform the NAND backup, which is a part of the script. If you don’t have enough space, follow these steps:
- Power off your console
- 將 SD 卡插入至電腦中
- Copy the
Nintendo 3DSfolder from the root of your SD card to your computer - Delete the Nintendo 3DS folder from the SD card
- Reinsert your SD card into your console
- Press and hold (Start), and while holding (Start), power on your console. 這將會啟動 GodMode9
- Press the (Home) button
- 選擇『Scripts…』
- Select “finalize”
- Press (A) to create a NAND backup
- This may take around fifteen minutes
- Press (A) again
- The console should automatically power off
- 將 SD 卡插入至電腦中
- Copy the files in
/gm9/backups/on your SD to a safe location on your computer - Delete the
<date>_<serialnumber>_sysnand_##.binand<date>_<serialnumber>_sysnand_##.bin.shafiles from the SD card - Copy the
Nintendo 3DSfolder from your computer to the root of your SD card - Delete the
Nintendo 3DSfolder from your computer
Now that you have your NAND backup in a safe place:
- Reinsert your SD card into your console
- Press and hold (Start), and while holding (Start), power on your console. 這將會啟動 GodMode9
- Press the (Home) button
- 選擇『Scripts…』
- Select “finalize”
- Continue the script as normal
- The NAND backup will be automatically skipped
Information #05: No title database
Press (A) to import a title database, unlock SysNAND writing by entering the buttons on-screen, then continue the script as normal.
Error #06 or "Error: Could not open directory" when attempting a NAND backup
Make sure you have at least 1.3GB available in your SD card. If you don’t have enough space, follow these steps:
- Power off your console
- 將 SD 卡插入至電腦中
- Copy the
Nintendo 3DSfolder from the root of your SD card to your computer - Delete the Nintendo 3DS folder from the SD card
- Reinsert your SD card into your console
- Press and hold (Start), and while holding (Start), power on your console. 這將會啟動 GodMode9
- Perform a NAND Backup
- Copy the files in
gm9/outon your SD to a safe location on your computer - Delete the
<date>_<serialnumber>_sysnand_##.binand<date>_<serialnumber>_sysnand_##.bin.shafiles from the SD card, keeping essential.exefs in/gm9/out/ - Copy the
Nintendo 3DSfolder from your computer to the root of your SD card - Delete the
Nintendo 3DSfolder from your computer
If you have enough space on your SD card, your SD might be corrupted or faulty. Check your SD card for any errors by following the guide according to your computer’s operating system: Windows, Linux, macOS.
Error #12: Copy (file).db fail
Ensure that your SD card is not locked. If the SD card is not locked and you continue to get this error, join Nintendo Homebrew on Discord for assistance.
Information #17: Duplicate NAND backup
The script has detected that the Nintendo 3DS folder is missing AND that you have already made a NAND backup before. If you intend to install homebrew applications, you should do the following:
- Press (B) to cancel making another NAND backup
- Hold (R) and press (Start) at the same time to power off your console
- Copy the contents of
/gm9/backups/to a safe location on your computer - Delete
/gm9/backups/from your SD card - If you moved your Nintendo 3DS folder off of your SD card to get to this point, copy it back to your SD card
- If you do not have a Nintendo 3DS folder, boot into the HOME Menu at least once with the SD card inserted to automatically generate it
- Press and hold (Start), and while holding (Start), power on your console. 這將會啟動 GodMode9
- 按『Home』鍵以叫出主選單
- 選擇『Scripts…』
- Select “finalize”
- Follow the prompts in the script, answering any questions that you are asked
Error #18: MSET9 detected
You didn’t remove MSET9 when prompted to. Follow Section IV - Removing MSET9 from the Windows/macOS/Linux guide or the Android/ChromeOS guide, then re-run the script.
Boot issues on consoles with custom firmware
The steps detailed here generally assume that your console has a modern custom firmware setup (boot9strap + Luma3DS 8.0 or greater). 如果你的主機還在用舊版的自製韌體(例如基於 arm9loaderhax 或 menuhax 的安裝),則你應該在繼續操作前先升級自製韌體。
Power/notification light indicators
My console powers off when I try to turn it on, and/or the notification LED shows a color on boot
There is an issue with your boot.firm file. If you’re running boot9strap 1.4, your 3DS notification LED may flash a certain color. This color is used to diagnose issues involving your boot.firm file on SD card or internal memory. On older versions of boot9strap, the blue light will power off almost immediately when trying to turn on the console.
If the notification LED flashes:
- White: Your 3DS was not able to find
boot.firmon your SD card or on internal memory. - Magenta: Your 3DS was not able to find
boot.firmon your SD card. It was able to findboot.firmon internal memory, but the file is corrupted. - Red: Your 3DS was able to find
boot.firmon both your SD card and on internal memory, but both files are corrupted.
You can get a new boot.firm file by downloading the latest release of Luma3DS, extracting it, and placing boot.firm on the root of your SD card. If your boot.firm file is consistently being detected as corrupted, you may want to check your SD card for errors (Windows, Linux, or macOS). Also, note that the 3DS tends to have issues with files extracted using WinRAR.
If you hear a “popping sound”, potentially accompanied with the backlight turning on for a split second, there is a hardware issue with your console (such as a disconnected backlight cable). You may be able to get your console to boot by holding it at certain angles.
My console gets stuck on a black screen with blue power light staying on
以下是可以嘗試的解決方法,按最省時到最耗時的順序排列。
- Power off your console, remove the SD card, re-insert it, then power on your console.
- Power off your console, eject the game cartridge if inserted, power on your console, then wait up to ten minutes. If your console boots within ten minutes, the issue has been fixed and is unlikely to reoccur
- 將 SD 卡上的
Nintendo 3DS資料夾重命名為Nintendo 3DS_BACKUP,然後試著開機。 If your console successfully boots, there is some issue within yourNintendo 3DSfolder. 試著刪除 HOME 主選單的外存 (extdata):- 移動至
/Nintendo 3DS/<ID0>/<ID1>/extdata/00000000/ - Delete the corresponding folder for your 3DS region:
- 歐版:
00000098 - 日版:
00000082 - 美版:
0000008f - 大陸版:
000000A1 - 韓版:
000000A9 - 台灣版:
000000B1
- 歐版:
- 移動至
- 試試看透過還原模式更新您的系統:
- Power off your console
- 按住「L」鍵 +「R」鍵 +「上」鍵 +「A」鍵
- Power on your console
- If you were successful, the console will boot to an “update your system” screen
- 遵循CTRTransfer中的步驟
- 請至 Discord 的 Nintendo Homebrew 伺服器中尋求協助。
Error message on boot
"An error has occurred: Failed to apply 1 FIRM patch(es)" or "An exception has occurred -- Current process: pm"
你主機的 Luma3DS 版本已過時。 下載最新版本的Luma3DS 並將 boot.firm 放在你 SD 卡的根目錄中,如有存在相同檔案請直接覆蓋。 請不要用 WinRAR 解壓 ZIP 檔案;目前已知使用此軟體會導致與 3DS 有關的檔案的問題。
"Unable to mount CTRNAND or load the CTRNAND FIRM. Please use an external one."
There are a number of reasons as to why this could be happening. In any case, this error can usually be fixed by following the CTRTransfer guide.
"An error has occurred. Hold down the POWER button to turn off the power..."
ARM11 異常處理器已被關閉,或主機尚未安裝自製韌體。 試著啟用 ARM11 異常處理器: + Power off your console + 按住「Select」鍵 + Power on your console, while still holding (Select) + 如果『ARM11 exception handlers disabled』已被勾選,請取消勾選
HOME Menu is missing installed applications
This could be caused by various reasons, but most likely because your SD card is not being read by the system. You can check if your SD is being read by holding SELECT on boot and checking the yellow text on the bottom screen; if it says “Booted from CTRNAND via B9S”, then your console is booting from the internal memory and not from the SD card. If this is the case, attempt the steps below, which are listed from easiest to hardest:
- Power off your console, remove the SD card, re-insert it, then power on your console
- Power off your console, remove the SD card, insert it on your computer, download the latest release of Luma3DS, extract
boot.firmfrom theLuma3DS.zipand place it on the root of your SD card (replacing any existing file) - Power off your console, remove the SD card, insert it on your computer and reformat your SD card according to your computer’s operating system: Windows, macOS, Linux (this will wipe your SD card data)
- Test your SD card for errors by following the guide according to your computer’s operating system: Windows, Linux, macOS. If your SD card is marked as faulty, then you will have to replace your SD card
- Your SD card slot may be broken. Join Nintendo Homebrew on Discord for further assistance
Blue "BOOTROM ERROR" screen
Your console is likely hard-bricked. You will need to buy an ntrboot flashcart to reinstall boot9strap in order to attempt to fix your console. This may also indicate a hardware issue that cannot be fixed. 不論如何,請加入 Discord 上的 Nintendo Homebrew 伺服器 尋求幫助。 + 也有可能是有人惡作劇,把您主機的開機畫面改成像是磚機的畫面。 Try leaving your console powered on, waiting on the blue screen, for five minutes.
Some other error
請將錯誤訊息拍下,請加入 Discord 上的 Nintendo Homebrew 頻道尋求協助。
Software issues on consoles with custom firmware
DSi / DS functionality is broken or has been replaced with Flipnote Studio
-
- 下載最新版的 TWLFix-CFW (
.3dsx檔案)
- 下載最新版的 TWLFix-CFW (
- Power off your console
- 在 SD 卡的根目錄底下建立一個新資料夾
3ds - 將
TWLFix-CFW.3dsx複製到 SD 卡中的/3ds/資料夾底下 - Reinsert your SD card into your console
- 啟動 Homebrew Launcher
- 於 Homebrew 清單內啟動 TWLFix-CFW 管理器
- 按 『A』 移除損壞的 TWL 程式
- Press (Start) to reboot the console
- Update your console by going to System Settings, then “Other Settings”, then going all the way to the right and using “System Update”
- 更新程式將會偵測到裝置必要的 TWL 軟體已被移除,並重新下載和安裝它們
- Once the update is complete, tap “OK” to reboot the console
GBA Virtual Console and/or Safe Mode functionality is broken
Your console is running Luma3DS 6.6 or older, likely via arm9loaderhax. You should follow A9LH to B9S to update your console to a modern custom firmware environment.
Extended memory mode games (Pokemon Sun/Moon, Smash, etc.) don't work
舊版 3DS / 2DS 在做完 CTRTransfer 或區碼變更之後可能會出現這個問題。 You will need to system format your console to fix this issue.
Exception screen when booting/loading an application
Look for your exception screen in this page. If you weren’t able to find your error or the instructions didn’t work, join Nintendo Homebrew on Discord for further assistance.
Opening the HOME Menu settings crashes the console or loads the Homebrew Launcher
Your console likely still has menuhax67 installed. To uninstall menuhax67, download the latest release of menuhax67 (the menuhax .zip), then follow the “Uninstall menuhax67” section here.
其他疑難排解
Clear HOME Menu extdata
- Power off your console
- 將 SD 卡插入至電腦中
- 移動至您 SD 卡的
/Nintendo 3DS/<ID0>/<ID1>/extdata/00000000資料夾中 - 刪除對應您 3DS 區域的資料夾:
- 歐版:
00000098 - 日版:
00000082 - 美版:
0000008f - 大陸版:
000000A1 - 韓版:
000000A9 - 台灣版:
000000B1
- 歐版:
- Reinsert your SD card into your console
Clear HOME Menu theme data
- Power off your console
- 將 SD 卡插入至電腦中
- 移動至您 SD 卡的
/Nintendo 3DS/<ID0>/<ID1>/extdata/00000000資料夾中 - 刪除對應您 3DS 區域的資料夾:
- 歐版:
000002ce - 日版:
000002cc - 美版:
000002cd
- 歐版:
- Reinsert your SD card into your console
Manually entering Homebrew Launcher
If you are missing the Homebrew Launcher application from your HOME Menu, you can follow these instructions to manually enter the Homebrew Launcher. (You will need boot.3dsx and boot.firm on the root of your SD card.)
- 啟動『下載通信(Download Play)』程式 (
 )
) - 等到你看到
Nintendo 3DS和Nintendo DS按鈕 - 同時按下『L』+『下』+『Select』鍵以啟動 Rosalina 選單
- 選擇『Miscellaneous options』
- 選擇『Switch the hb. title to the current app.』
- 按『B』繼續
- 按『B』回到 Rosalina 主選單
- 按『B』退出 Rosalina 選單
- Press (Home) to suspend Download Play
- Press the “Close” button on the bottom screen to close Download Play
- Re-launch the Download Play application
- Your console should load the Homebrew Launcher
- If your console is stuck on the loading splash screen, you are missing
boot.3dsxfrom the root of your SD card
- If your console is stuck on the loading splash screen, you are missing
Turning off Parental Controls
You can disable the Parental Controls feature by going to System Settings -> Parental Controls and inserting the PIN, then pressing “Clear Settings”, then “Delete” to remove it. However, if you do not know the PIN and therefore cannot access the console’s settings, you will need to disable it. In order to do this, you need to obtain your console’s master key (mkey):
- Go to this website
- Fill the following boxes with the information:
- Device Type: Select “3DS” (the same applies if you are using a 2DS, New 3DS (XL/LL) or New 2DS (XL/LL))
- System Date: The day and month your console’s clock is set to
- Inquiry Number: Can be obtained by pressing “Forgot PIN” then “I Forgot” in the Parental Controls screen
- After you have obtained your mkey, press OK on the screen you have obtained your Inquiry Number, then input the master key
- Press “Clear Settings”, then “Delete” to remove all Parental Controls data