完成安裝
必讀事項
在載入完 NAND 的內容後,boot9strap 會自動加載 boot.firm 中的內容。 In this case, we are using Luma3DS by LumaTeam to patch the console, allowing it to run homebrew software.
On this page, we will make critical system file backups and install some homebrew programs. Most of these steps will be automated using a script that you will run on your console.
The script will install the following applications:
- FBI (installs CIA formatted applications)
- Homebrew Launcher Loader (launches the Homebrew Launcher)
- Anemone3DS (installs custom themes)
- Checkpoint (backs up and restores save files for 3DS and DS games)
- ftpd (access your 3DS SD card wirelessly)
- Universal-Updater (a homebrew app store for downloading homebrew from the 3DS over Wi-Fi)
- GodMode9 (multipurpose tool which can do NAND and cartridge functions)
If you don’t want one of these applications, you can remove them after you have finished this page by navigating to System Settings -> Data Management -> Nintendo 3DS -> Software. (GodMode9 cannot be removed in this way and is generally required for other functions.)
相容性資訊
If your New 3DS was on version 2.1.0 before following this guide, you should restore your NAND backup before continuing. This likely doesn’t apply to you unless you were following this guide in 2017.
如果您先前的自製韌體為基於 EmuNAND 的系統,且您希望將您的 EmuNAND/RedNAND 移植至 SysNAND,請在繼續前進行 移植 EmuNAND 頁面中的指示。 如果您不知道 EmuNAND 是什麼的話,這部分大概不適用於您。
必備項目
- finalize_helper.firm (direct download)
- finalize.romfs (direct download)
操作說明
第一節 — 準備工作
In this section, you will copy the files necessary to follow the rest of the instructions on this page.
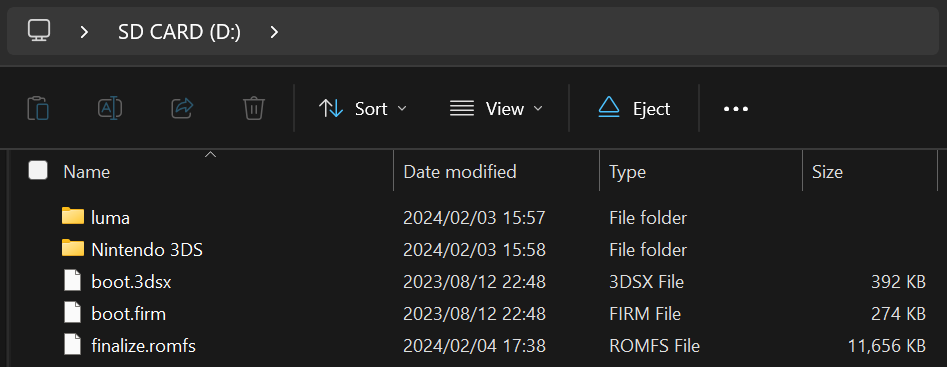
- Power off your console
- 將 SD 卡插入至電腦中
- Copy
finalize.romfsto the root of your SD card - Open the
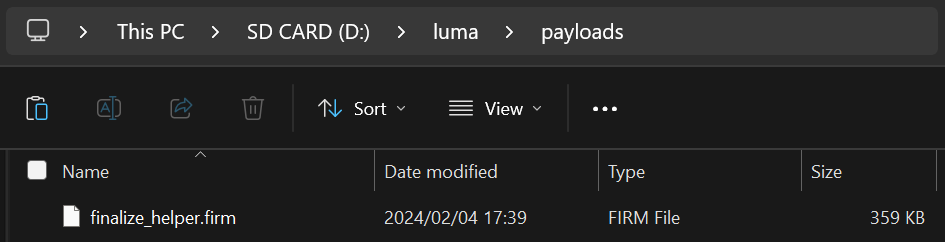
lumafolder on your SD card and create a folder namedpayloadsinside, if it does not already exist - Copy
finalize_helper.firmto thepayloadsfolder - Reinsert your SD card into your console
The screenshot below indicates the minimum SD card layout that is required to follow this page. 您可能在遵循其他頁面指示中會有一些多的資料夾及檔案在您的 SD 卡中。
Section II - Updating the System
In this section, you will update your system to the latest version, which is safe to do with custom firmware.
- Update your console by going to System Settings, then “Other Settings”, then going all the way to the right and using “System Update”
- 在安裝 B9S + Luma 後,進行系統更新是很安全的
- 升級程式可能會告訴你『你的主機已經是最新系统了』而不是繼續升級 This is normal if you are already up to date; continue to the next section
- If this gives you an error, set both your DNS settings and Proxy settings to “Auto”
- If this still gives you an error, follow this troubleshooting guide
Section III - RTC and DSP setup
In this section, you will sync your 3DS internal clock with the actual time and dump the sound firmware (which is necesssary for some homebrew software to use sound properly).
- 同時按下『L』+『下』+『Select』鍵以啟動 Rosalina 選單
- If one of these buttons is broken, download config.ini and put it in your
lumafolder, replacing the existing one. This will change the Rosalina menu key combination to (X) + (Y)
- If one of these buttons is broken, download config.ini and put it in your
- 選擇『Miscellaneous options』
- 選擇『Dump DSP firmware』
- 按『B』繼續
- 選擇『Nullify user time offset』
- 按『B』繼續
- 按『B』回到 Rosalina 主選單
- 按『B』退出 Rosalina 選單
Section IV - Setup Script
In this section, you will use a series of scripts to automate homebrew installation, SD card cleanup, and system file backup.
- Power off your console
- Press and hold (Start), and while holding (Start), power on your console. This will launch the Finalizing Setup Helper
- If you boot to the Luma3DS configuration menu, you held SELECT instead of START
- If you boot to the HOME Menu, your
payloadsfolder may be incorrectly spelled or in the wrong location - If you see a “Luma3DS Chainloader” menu, use the D-Pad and (A) buttons to navigate to and select
finalize_helperfrom the list - If you encounter an error, consult the troubleshooting page
- If the Helper was successful, your console will boot into GodMode9
- From this point forward, you can access GodMode9 by holding START while powering on your console
- 當提示重要檔案備份時,按下『A』繼續,並在完畢後按下『A』繼續
- 當提示修正 RTC 日期及時間時,按『A』繼續並設定日期及時間,再按『A』繼續
- 按『Home』鍵以叫出主選單
- 選擇『Scripts…』
- Select “finalize”
- Follow the prompts in the script, answering any questions that you are asked
- If you encounter an error, follow the instructions in the error message or consult the troubleshooting page
- Once the script says “Setup complete!”, press (A) to power off the device
- If you do NOT see the message “Setup complete!”, the script was not successful and you will need to redo this section from Step 3
- 將 SD 卡插入至電腦中
- Copy the
/gm9/backups/folder to a safe location on your computer- This folder contains critical file backups and should be backed up to multiple locations (i.e. cloud storage) if possible
- The two SysNAND files are your NAND backup and can be used to revert your console to a working state if it is bricked by a software issue
- The
essential.exefsfile contains your console’s system-unique files and can be used to recover your data in the event of a hardware failure
- If you still have them, delete the two
SysNANDfiles from the/gm9/backups/folder from your SD card- The
essential.exefsfile is small and may be kept on your SD card for ease of access
- The
大功告成! Custom firmware is now fully configured on your console.
Trying to figure out what to do with your newly modded device? Visit our wiki!
Information and Notes
以下是你該注意的快捷鍵:
- Holding (Select) on boot will launch the Luma3DS configuration menu.
- Holding (Start) on boot will launch GodMode9, or if you have multiple payloads in
/luma/payloads/, the Luma3DS chainloader. - By default, pressing (Left Shoulder) + (Down D-Pad) + (Select) while in 3DS mode will open the Rosalina menu, where you can check system information, take screenshots, enable cheats, and more. 這可以從 Rosalina 選單更改。
- Holding (Start) + (Select) + (X) on boot will make the notification LED show a color for debug purposes. See the changelog for a list.
有關如何使用 GodMode9 的各種功能,請見GodMode9 用法 及 轉存程式及遊戲卡帶 頁面。