Installing boot9strap (MSET9 CLI iOS)
기술적 상세 정보 (선택 사항)
MSET9 은 zoogie 에 의해 개발된 본체 설정 앱의 취약점을 공략하는 방법입니다. 이 취약점은 ID1의 이름이 어떤 이름이든 간에 32글자면 된다는 것을 이용합니다. (ID1 폴더는 Nintendo 3DS 폴더 속, 32글자짜리 ID0 폴더 안에 있는 또다른 32글자 폴더입니다.) Performing a specific sequence of actions results in the console executing the instructions that are encoded into the ID1 folder name, which can be used to grant full control over the 3DS.
호환성 안내
WARNING
This page requires an iPhone or iPad running iOS/iPadOS 14.0 or higher. 만약 윈도우나 macOS, 리눅스가 가동되는 컴퓨터를 가지고 있다면, 이 방법 대신 boot9strap 설치 (MSET9 CLI) 를 따르세요. 안드로이드 폰, 태블릿, 혹은 크롬북을 가지고 있을 경우, boot9strap 설치 (MSET9 Play 스토어)를 참조해 주세요. 만약 이 장비들 중 하나도 사용할 수 없는 상황이라면, 다른 취약점을 사용해야 할 수 있습니다.
WARNING
As iPhones and iPads do not have an SD card slot, you will need an adapter to plug in your SD card to your device (e.g. a Lightning to SD card or USB-C to SD card adapter).
준비물
- iSH from App Store
진행 방법
INFO
이 페이지에서, MSET9 스크립트를 사용하여, MSET9을 작동시킬 것입니다. 스크립트가 진행되는 동안 사용자 데이터는 일시적으로 사라지지만 이 페이지가 완료되면 정상적으로 되돌아옵니다. 만약 스크립트를 실행하는 과정에서 에러가 발생할 경우, 에러 메세지에 대한 해결법은 대부분 troubleshooting 페이지에서 확인할 수 있습니다.
섹션 I - 준비 작업
In this section, you will prepare the MSET9 exploit by temporarily creating a new HOME Menu profile with no user data, and then setting up that profile with only the minimum data required for MSET9 to trigger. 현재 존재하는 유저 데이터는 사라지지만, 이 페이지의 작업을 끝낸다면 다시 복구될 것입니다.
Insert your SD card into your iPhone/iPad (using an adapter)
Copy the following command:
wget -O - https://3ds.hacks.guide/assets/imset9.sh | sh- Tap on the box above and a Copy icon should appear
Open the iSH application
Paste the above command by tapping the paste button at the top right corner of your keyboard, then tap Return to run the command
Select your SD card in the Files popup, then tap "Open" at the top right corner of the popup
INFO
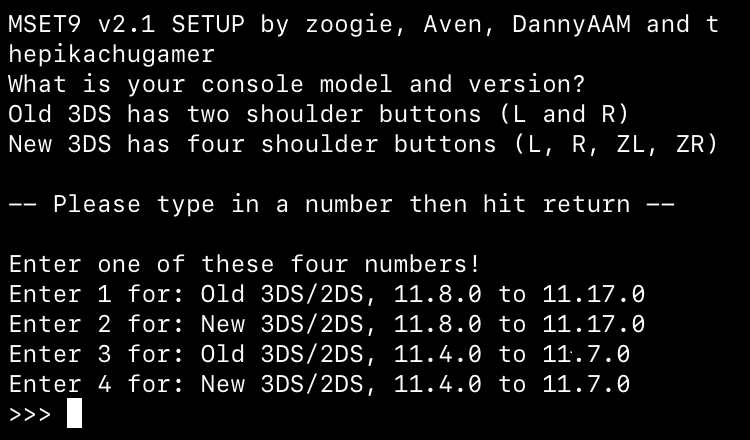
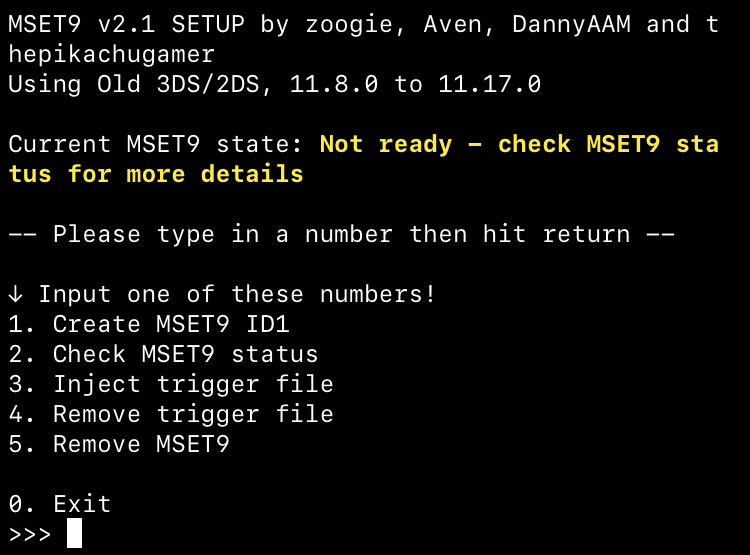
Type the number corresponding to your console model and version, then tap Return
- The screen should change to this:
INFO

- 화면에 표시된 모델과 버전이 정확한지 확인해 주세요
Type
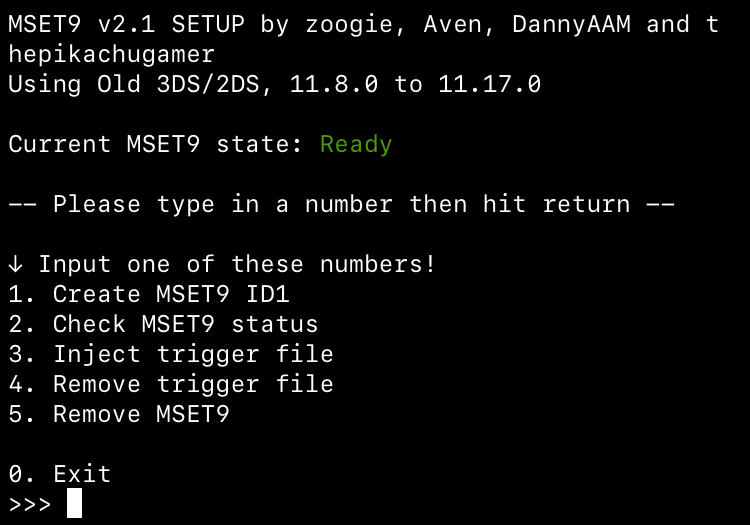
1, then tap Return to begin the process of creating the MSET9 ID1After reviewing the disclaimer, type
1again and tap Return to accept it- 에러 발생시, 문제 해결을 확인 후 다시 시도해 주세요
If you see the message "Created hacked ID1.", tap Return to close the MSET9 script
- Your 3DS will appear to have no data / no user-installed apps on HOME Menu. 이건 예상된 결과입니다. 이후 과정을 거치면서 원본 데이터는 복구될 것입니다
SD 카드를 콘솔에 다시 삽입해 주세요
콘솔의 전원을 켜 주세요
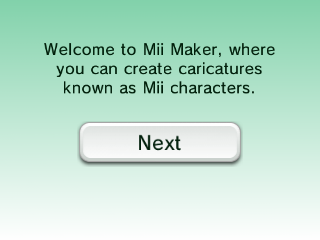
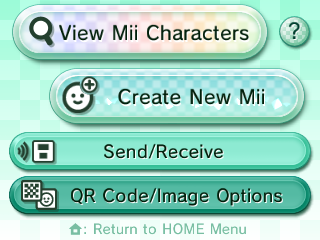
Mii 스튜디오를 열어주세요
콘솔이 Mii 스튜디오에 오신 것을 환영합니다! (영어 사진) 화면까지 오면, Mii 스튜디오를 종료하고 HOME 메뉴로 나가주세요
- 이 화면 (영어)을 보게 될 것입니다. 필요한 파일을 작성하고 있는 것이니 기다려주세요
- (영어 사진) 일반적인 Mii 스튜디오 화면을 보게된다면, 데이터가 이미 존재하는 것입니다. Mii 스튜디오를 종료한 후 HOME 메뉴로 돌아가세요.
본체 설정을 실행한 후
데이터 관리->Nintendo 3DS 데이터 관리->소프트웨어 관리-> 초기화 (영어 사진)로 이동해 주세요.- 이 과정은 데이터를 삭제하지 않습니다.
Power off your console by pressing the power button then tapping Power Off on the lower screen
Insert your SD card into your iPhone/iPad (using an adapter)
Copy the following command:
wget -O - https://3ds.hacks.guide/assets/imset9.sh | sh- Tap on the box above and a Copy icon should appear
Open the iSH application
Paste the above command by tapping the paste button at the top right corner of your keyboard, then tap Return to run the command
Select your SD card in the Files popup, then tap "Open" at the top right corner of the popup
Type the number corresponding to your console model and version, then tap Return
- The screen should change to this and display
Ready:
INFO
- If the screen says Not ready - check MSET9 status for more details:
- Type
2, then tap Return to check the MSET9 status and follow the directions indicated - 문제가 해결되었다면, 섹션 I 14단계로 가 주세요
- 더 많은 정보를 얻으려면, 문제 해결 페이지를 확인하세요
- Type
- The screen should change to this and display
Type
0, then tap Return to close the scriptSD 카드를 콘솔에 다시 삽입해 주세요
섹션 II - MSET9
이 섹션에서는, MSET9을 작동시켜 SafeB9SInstaller (커스텀 펌웨어 설치 프로그램) 를 실행할 것입니다.
DANGER
본 과정은 정확하게 진행되어야 하며, 오류를 막기 위해 모든 실행 과정을 재확인해야 합니다!
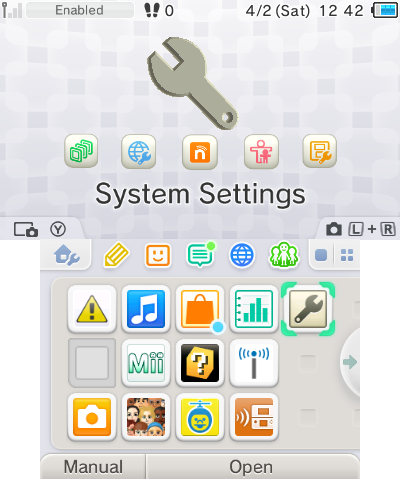
콘솔의 전원을 켜고, 본체 설정이 선택되어 있는지 확인하세요
- 본체 설정이 선택되어 있지 않다면, 십자 패드를 이용해 본체 설정 앱을 띄워 놓고 (영어 사진), 전원을 종료한 뒤, 다시 시도해 주세요
(A)를 눌러 본체 설정을 실행해 주세요
데이터 관리->Nintendo 3DS->추가 데이터 관리로 들어가주세요. (영어 사진)절대 어떠한 버튼도 만지지 말고 스크린도 터치하지 마세요
어떠한 버튼도 하단 화면도 건드리지 않은 상태에서, 기기의 전원이 여전히 켜진 상태에서 SD 카드를 기기에서 제거해 주세요
- The menu will refresh and say that no SD card is inserted
Insert your SD card into your iPhone/iPad (using an adapter)
Copy the following command:
wget -O - https://3ds.hacks.guide/assets/imset9.sh | sh- Tap on the box above and a Copy icon should appear
Open the iSH application
Paste the above command by tapping the paste button at the top right corner of your keyboard, then tap Return to run the command
Select your SD card in the Files popup, then tap "Open" at the top right corner of the popup
Type the number corresponding to your console model and version, then tap Return
In the MSET9 screen, type
3, then tap Return to inject MSET9- "MSET9 successfully injected!" 라는 메시지를 확인할 수 있을 것입니다
Tap Return to close the MSET9 script
어떠한 버튼도 하단 화면도 건드리지 않은 상태에서 SD 카드를 콘솔에 삽입해 주세요
익스플로잇이 성공적이었다면 SafeB9SInstaller로 부팅되었을 것입니다
- If you get a red screen or the console gets stuck on a loading screen for more than 10 seconds, follow the troubleshooting guide
섹션 III - boot9strap 설치하기
이 섹션에서는, 커스텀 펌웨어를 설치할 것입니다.
메시지가 나타나면, boot9strap을 설치하기 위하여 화면에 주어진 키 조합을 입력해 주세요
- If a step on the lower screen has red-colored text, and you are not prompted to input a key combo, follow this troubleshooting guide
- If the top screen is blank and you see "Crypto Status - all checks passed" on the bottom screen, you will have to enter key combo blindly. Press the following buttons on your console in this order:
- D-Pad Left, D-Pad Down, D-Pad Right, D-Pad Up, A
Once it is complete (all seven steps on the bottom screen are green), press (A) to reboot your console
콘솔은 Luma3DS 구성 메뉴로 부팅되었을 겁니다
- Luma3DS 구성 메뉴는 Luma3DS 커스텀 펌웨어의 설정들 입니다. 이 설정들은 디버깅 또는 맞춤화의 유용합니다
- 일단 이 가이드에서는 모든 설정을 기본으로 남겨 두세요 (켜기 또는 끄기를 누르지 마세요)
- If your console displays a white notification LED and shuts down when you try to power it on, ensure that you have Luma3DS's
boot.firmon the root of SD card (insideLuma3DSvX.X.X.zip)
(Start)를 눌러 저장하고 콘솔을 다시 시작해 주세요
섹션 IV - MSET9 제거
이 섹션에서는, 추가 문제를 방지하고 게임, 테마 등의 유저 데이터를 복구하기 위해 MSET9을 제거할 것입니다. (방금 설치한 커스텀 펌웨어가 지워지진 않습니다.)
DANGER
본 섹션은 절대 넘기면 안 됩니다! 본 섹션을 건너뛸 경우, 어플리케이션들이 충돌을 일으키고 다음 단계에서 오류가 발생할 것입니다.
콘솔의 전원을 꺼 주세요
Insert your SD card into your iPhone/iPad (using an adapter)
Copy the following command:
wget -O - https://3ds.hacks.guide/assets/imset9.sh | sh- Tap on the box above and a Copy icon should appear
Open the iSH application
Paste the above command by tapping the paste button at the top right corner of your keyboard, then tap Return to run the command
Select your SD card in the Files popup, then tap "Open" at the top right corner of the popup
Type the number corresponding to your console model and version, then tap Return
Type
4, then tap Return to remove the trigger file- "Removed trigger file"이라고 표시될 것입니다.
Type
5, then tap Return to remove MSET9- "Successfully removed MSET9!"이라고 표시될 것입니다
Tap Return to close the MSET9 script
이제 콘솔은 Luma3DS를 기본으로 부팅 됩니다.
- Luma3DS는 보통 HOME 메뉴와 똑같이 보입니다. 만약 콘솔이 HOME 메뉴로 부팅되었다면, 커스텀 펌웨어가 설치되어 있습니다.
- 다음 페이지에서는 커펌에 유용한 홈브류를 설치해 콘솔 준비를 완료할 것 입니다.
DANGER
섹션 IV - MSET9 제거를 진행하셨나요? 그 섹션은 필수적입니다.
TIP
마무리 단계 로 계속합니다