문제 해결 (MSET9)
이 페이지는 "boot9strap 설치 (MSET9)", "boot9strap 설치 (MSET9 CLI)", 또는 "boot9strap 설치 (MSET9 Play 스토어)" 페이지에서 흔히 일어나는 문제에 관한 해결책을 기재합니다. If you are unable to solve your issue with the advice on this page, please join Nintendo Homebrew on Discord and describe your issue, including what you have already tried.
MSET9 (application / script)
Python 3 is not installed
Python이 사용중인 컴퓨터에 설치되지 않았습니다. Python 웹사이트 에서 다운로드한 다음, 설치 프로그램을 더블 클릭한 다음, Python을 설치해 주세요. Python 설치가 완료된 뒤, 다시 시도해주세요.
HOME Menu extdata: Missing!
SD 카드를 삽입한 채로 콘솔의 전원을 켜고, MSET9의 상태를 다시 확인하세요.
만약 이래도 작동하지 않으면, SD 카드를 포맷해야 합니다:
Mii Maker extdata: Missing!
Mii Maker data was not found on the SD card. Please power on your console with your SD inserted, then launch Mii Maker, then check the MSET9 status again.
만약 이래도 작동하지 않으면, SD 카드를 포맷해야 합니다:
Title database: Not initialized!
Ensure that you have reset the title database.
- Please power on your console with your SD inserted
- 본체 설정을 실행한 후
데이터 관리->Nintendo 3DS 데이터 관리->소프트웨어 관리-> 초기화 (영어 사진)로 이동해 주세요.- 이 과정은 데이터를 삭제하지 않습니다.
- If you get a reset prompt, after resetting, power off your console and start again from Section I Step 14
If you do not getting a reset prompt, your SD card needs to be formatted:
SD 카드의 전체 데이터를 PC에 복사해두세요
PC에 복사해둔 데이터를 다시 SD 카드에 복사해 주세요
MSET9 스크립트를 실행해 주세요:
- Windows: Double-click
MSET9-Windows(orMSET9-Windows.bat) - macOS:
MSET9-macOS.command을 선택해 주세요. 만약 비밀번호 입력을 요구한다면 입력해 주세요 - 리눅스: 터미널 창을 연 다음 SD 카드로 경로를 설정하고
python3 mset9.py를 입력한 다음 엔터키를 눌러주세요
- Windows: Double-click
콘솔의 모델과 버전을 입력한 다음 엔터키를 눌러주세요
Type
2then press enter to check the MSET9 status- This will create the dummy databases again
Close the MSET9 script window
Start again from Section I Step 12.
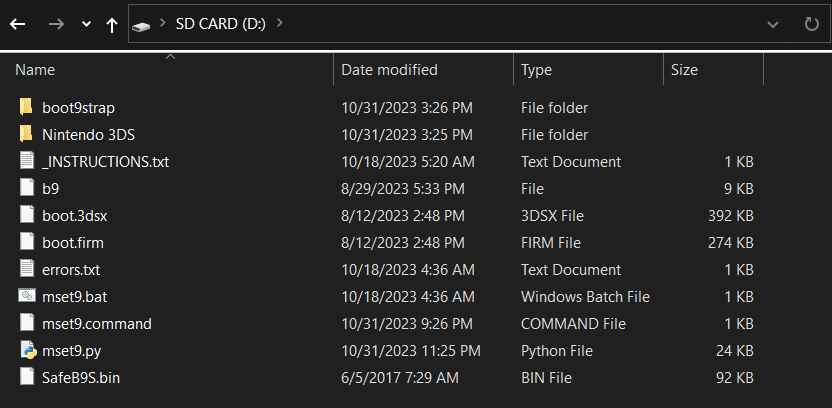
Error 01: Couldn't find Nintendo 3DS folder
You are not running MSET9 from the root of the SD card, or the SD card is missing the Nintendo 3DS folder.
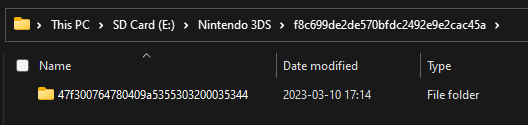
Remember, your SD card should look like this:
INFO
If your SD card layout is correct, then your SD card most likely isn't being read by your console and needs to be formatted:
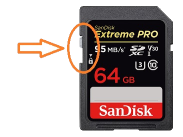
Error 02: Your SD is write protected
Write-protection is enabled on this SD card. If you are using a full-size SD card, ensure that the lock is flipped in the upright position. Otherwise, try ejecting and reinserting your SD card.
Error 04: You don't have 1 ID0, you have (#)!
You have multiple ID0 folders. To determine the correct folder, follow these instructions:
Nintendo 3DS폴더를BACKUP_Nintendo 3DS폴더로 이름을 변경해 주세요- SD 카드를 콘솔에 다시 삽입해 주세요
- 콘솔의 전원을 켜 주세요
- 콘솔이 SD 카드 데이터를 생성할 때까지 기다려 주세요
- Your applications will have disappeared. 이는 정상이며, 잠시 후에 고쳐질 것입니다.
- 콘솔의 전원을 꺼 주세요
- SD 카드를 컴퓨터에 삽입해 주세요
- SD 카드의
Nintendo 3DS폴더를 열어 주세요 - Write down the first few characters of the folder you see
- This is your true ID0, which we will keep in the real Nintendo 3DS folder
- Delete the ID0 from the current
Nintendo 3DSfolder - Move the true ID0 folder from the
BACKUP_Nintendo 3DSfolder to theNintendo 3DSfolder - If it exists, move the
Privatefolder from theBACKUP_Nintendo 3DSfolder to theNintendo 3DSfolder
Once you've done this, continue from Section I Step 3.
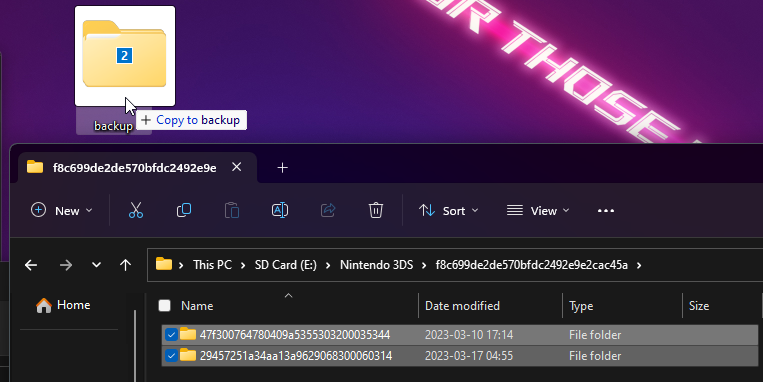
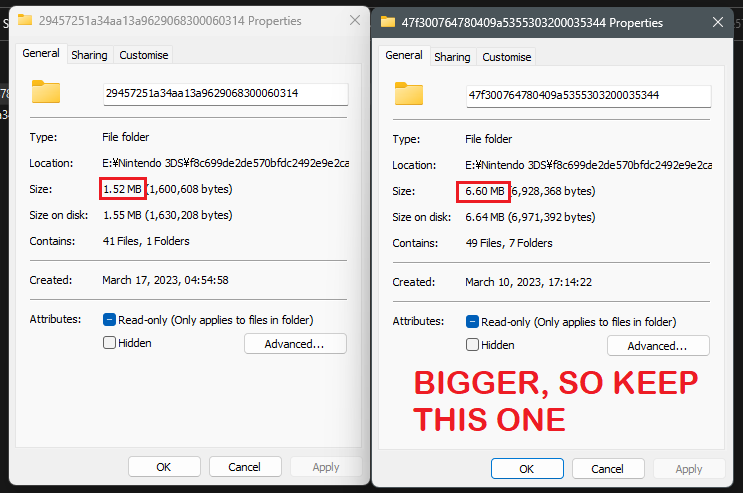
Error 05: You don't have 1 ID1, you have (#)!
이 경우는 여러 개의 SD 카드를 하나의 3DS에서 사용한 뒤 하나의 SD 카드로 몰아넣었을 때 발생합니다. 두 ID1 모두 유효하지만, 3DS는 한 번에 하나씩만 읽어낼 수 있습니다.
이 경우, 어떤 폴더에 중요한 데이터가 들어가 있는지 확인해야 합니다. 맨 먼저, 만일에 대비해 모든 폴더를 백업해두시기 바랍니다.
INFO
그리고, SD 카드에서 단 하나의 폴더만을 남기고 삭제해 줍니다. 보통은, 데이터가 들어간 폴더의 크기가 더 클 것이기 때문에 용량이 가장 작은 폴더를 지우고 싶을 것입니다. 오른쪽 클릭 후 "속성" 탭을 클릭하여 어떤 폴더가 공간을 더 차지하는지 비교해볼 수도 있습니다.
INFO
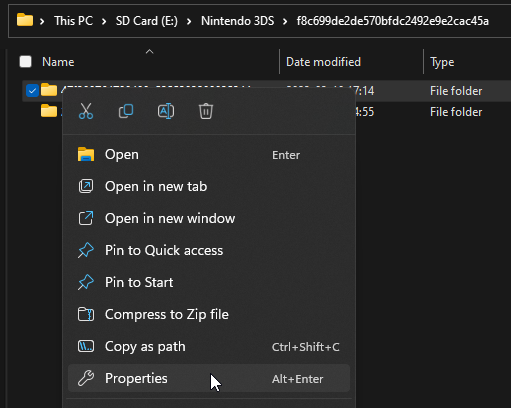
INFO
SD 카드는 이제 이렇게 보일 것입니다:
INFO
이제 SD 카드를 3DS에 넣은 다음 전원을 켜 주세요. 데이터가 여전히 있다면, 정확한 폴더를 지운 것이고 정확한 ID1을 찾아낸 것입니다. 모든 게 다 없어졌다면, 백업해둔 폴더를 다시 SD 카드에 복원한 다음 다른 폴더를 지워보세요.
Error 06: You need at least 16MB free
Your SD card does not have enough space to trigger MSET9. Free up some space and try again.
At the end of this guide, you will need at least 1.3GB to make a NAND backup, so it's best to free up at least that much.
Error 07: One or more files are missing or malformed!
One or more files that MSET9 needs to run is missing or corrupted. Re-download the MSET9 Release .zip and extract it to the root of your SD card, replacing all existing files, then try again.
Error 18: Windows Locale Settings are broken!
윈도우 10 이상 환경에서 MSET ID1을 생성하게 되면, 이런 에러와 함께 오류가 날 수 있습니다:

해당 오류는 윈도우의 UTF-8 지원과 관련된 베타 기능 때문에 발생합니다. MEST9를 실행하기 위해선 이를 비활성화 해야합니다:
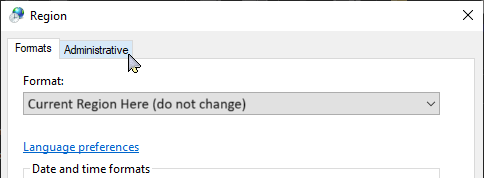
윈도우 키 + R을 입력해 실행 창을 열고,
intl.cpl을 입력한 후 "확인"을 클릭하세요.INFO

Click on
Administrative, thenChange System LocaleINFO
INFO
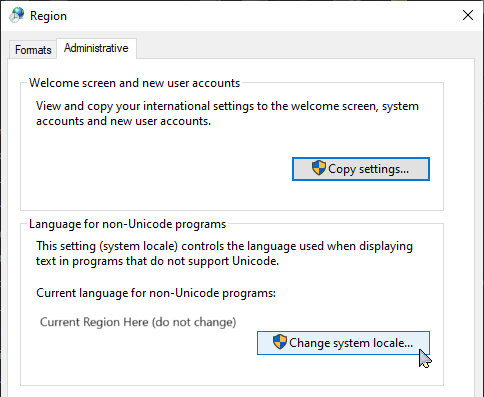
Uncheck the box next to
Beta: Use Unicode UTF-8 for worldwide language supportthen click "OK"INFO
Click "Restart Now"
INFO
PC가 재부팅된 후, MSET9 ID1을 다시 생성해보세요.
FileNotFoundError: [Errno 2] No such file or directory
To manually remove MSET9, follow these instructions:
- SD 카드의
Nintendo 3DS폴더를 열어 주세요 - Open the 32 character long folder that you see
- You should see two folders, delete the folder containing garbled text
- If the remaining folder ends with _user-id1, remove _user-id1 by renaming it
- MSET9 is now removed, consider this a completion of Section IV
MSET9 (exploit)
Red screen after reinserting SD card (Section II Step 11)
You may be missing SafeB9S.bin from the root of your SD card, or the file may be corrupted. Copy it from the MSET9 .zip, replacing any existing files then follow these instructions to remove the trigger file:
Force power off your console by holding the Power button for 20 seconds
SD 카드를 컴퓨터에 삽입해 주세요
MSET9 스크립트를 실행해 주세요:
- Windows: Double-click
MSET9-Windows(orMSET9-Windows.bat) - macOS:
MSET9-macOS.command을 선택해 주세요. 만약 비밀번호 입력을 요구한다면 입력해 주세요 - 리눅스: 터미널 창을 연 다음 SD 카드로 경로를 설정하고
python3 mset9.py를 입력한 다음 엔터키를 눌러주세요
- Windows: Double-click
콘솔의 모델과 버전을 입력한 다음 엔터키를 눌러주세요
- 현재 상태가 Injected로 표시되어야 합니다
- If you have already removed the trigger file (or never injected in the first place), the current state will show Ready, and you may retry Section II
Type
4, then press EnterOnce the window says "Removed trigger file", type
0and then press EnterReinsert the SD card into your console
콘솔의 전원을 켜 주세요
Return to Section II Step 1
Alternatively, your SD card may be improperly formatted or partitioned. After removing the trigger file, format it:
- SD 카드의 전체 데이터를 PC에 복사해두세요
- SD 카드를 포맷해 주세요 (Windows, Linux, macOS)
- PC에 복사해둔 데이터를 다시 SD 카드에 복사해 주세요
- Start again from from Section II Step 1
System Settings loading infinitely after reinserting the SD card
You most likely did something different from the MSET9 instructions, selected the wrong model/version, or your SD card needs to be formatted. Ensure you are choosing the correct model and firmware version when opening the script.
Follow these instructions to remove the trigger file and to retry Section II:
Force power off your console by holding the Power button for 20 seconds
SD 카드를 컴퓨터에 삽입해 주세요
MSET9 스크립트를 실행해 주세요:
- Windows: Double-click
MSET9-Windows(orMSET9-Windows.bat) - macOS:
MSET9-macOS.command을 선택해 주세요. 만약 비밀번호 입력을 요구한다면 입력해 주세요 - 리눅스: 터미널 창을 연 다음 SD 카드로 경로를 설정하고
python3 mset9.py를 입력한 다음 엔터키를 눌러주세요
- Windows: Double-click
콘솔의 모델과 버전을 입력한 다음 엔터키를 눌러주세요
Type
4, then press EnterOnce the window says "Removed trigger file", type
0and then press EnterReinsert the SD card into your console
콘솔의 전원을 켜 주세요
Return to Section II Step 1
If you continue to have this issue and are sure that you did everything correctly, ensure the trigger file is removed and format your SD card:
- SD 카드의 전체 데이터를 PC에 복사해두세요
- SD 카드를 포맷해 주세요 (Windows, Linux, macOS)
- PC에 복사해둔 데이터를 다시 SD 카드에 복사해 주세요
- Start again from from Section II Step 1
An exception occurred after triggering MSET9
이미 커스텀 펌웨어가 설치되어 있을 수 있습니다. CFW 확인 을 하는 것을 권장합니다.
SafeB9SInstaller와의 문제
SafeB9SInstaller 실행 전
Failed to open SafeB9SInstaller.bin
SafeB9SInstaller.bin 파일이 없거나 잘못 들어갔습니다. 최신 버전의 SafeB9Installer을 다운받아 압축을 풀고, SD 카드의 최상위 디렉토리에 SafeB9Installer.bin을 복사해주세요. .bin 확장자는 보이지 않는 이상 추가하지 말아 주세요.
SigHaxed FIRM was not installed! Check lower screen for more info.
MicroSD Card - init failed
SD 카드에 이상이 있을 가능성이 높습니다. 다시 포맷해 보세요 (Windows, macOS, Linux). 이렇게까지 했는데도 효과가 없으면, 다른 SD 카드로 시도해보세요.
SigHaxed FIRM - File not found
boot9strap 폴더에 boot9strap.firm과 boot9strap.firm.sha가 없거나, boot9strap 폴더의 이름이 잘못되어 있습니다. boot9strap의 최신 버전을 다운로드하여, boot9strap.firm과 boot9strap.firm.sha를 boot9strap 폴더로 복사해 주세요.
SigHaxed FIRM - invalid FIRM
boot9strap.firm과 boot9strap.firm.sha 파일에 문제가 있습니다. boot9strap의 최신 버전을 다운로드하여, boot9strap.firm과 boot9strap.firm.sha를 boot9strap 폴더로 복사해 주세요.
Secret Sector - File not found
boot9strap 폴더에 secret_sector.bin 파일이 없거나, boot9strap 폴더의 이름이 잘못되어 있습니다. secret_sector.bin 파일을 토렌트 클라이언트로 다운로드하고, 이 파일을 boot9strap 폴더에 복사해 주세요
기타
Join Nintendo Homebrew on Discord for assistance, and describe the issue that you see.
TIP
boot9strap 설치 (MSET9 CLI)로 돌아갑니다
TIP
TIP
문제 해결로 돌아갑니다