Installing boot9strap (SSLoth-Browser)
Technical Details (optional)
In order to exploit the Browser application, we need to bypass the browser version check, which is designed to disallow the use of the browser without updating to the latest system version.
A public proxy server is available, which, with the help of the SSLoth exploit, can bypass this check.
Once the bypass is active, an exploit webpage will be accessible which will do the rest of the job.
For technical details on the exploits that you will be using on this page, see here (SSLoth) and here (universal-otherapp).
Compatibility Notes
SSLoth allows users on version 11.13.0 and below to bypass the browser version check, allowing the use of new-browserhax or old-browserhax (compatible with versions 11.4.0 through 11.13.0 in all regions), which can then be used in conjunction with universal-otherapp.
What You Need
- The latest release of SafeB9SInstaller (direct download)
- The latest release of boot9strap (direct download)
- The latest release of Luma3DS (the Luma3DS
.zipfile) - The latest release of universal-otherapp (
otherapp.bin)
Instructions
Section I - Prep Work
In this section, you will copy the files needed to trigger both browserhax and universal-otherapp.
- Power off your console
- Insert your SD card into your computer
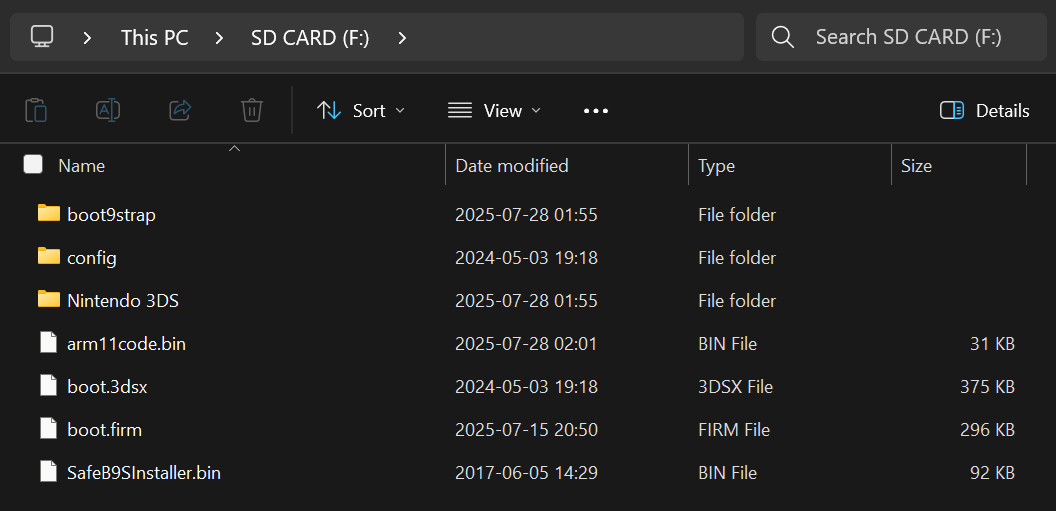
- Copy
otherapp.binto the root of your SD card and rename it toarm11code.bin- The root of the SD card refers to the initial directory on your SD card where you can see the Nintendo 3DS folder, but are not inside of it
- If you do not see the
.binextension, do not add it to the end of the filename
- Copy everything from the Luma3DS
.zipto the root of your SD card - Create a folder named
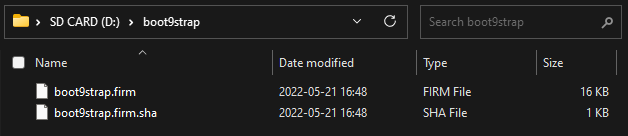
boot9strapon the root of your SD card - Copy
boot9strap.firmandboot9strap.firm.shafrom the boot9strap.zipto the/boot9strap/folder on your SD card - Copy
SafeB9SInstaller.binfrom the SafeB9SInstaller.zipto the root of your SD card - Reinsert your SD card into your console
- Power on your console
INFO
INFO
Section II - SSLoth
In this section, you will change your Internet connection settings to use a proxy network designed to bypass the browser version check, allowing the browser to function without a system update. This will allow you to access the browser exploit webpage in the next section.
INFO
If you haven't already, make sure you have a working Internet connection set up on your console.
TIP
A visual guide is available for this section here.
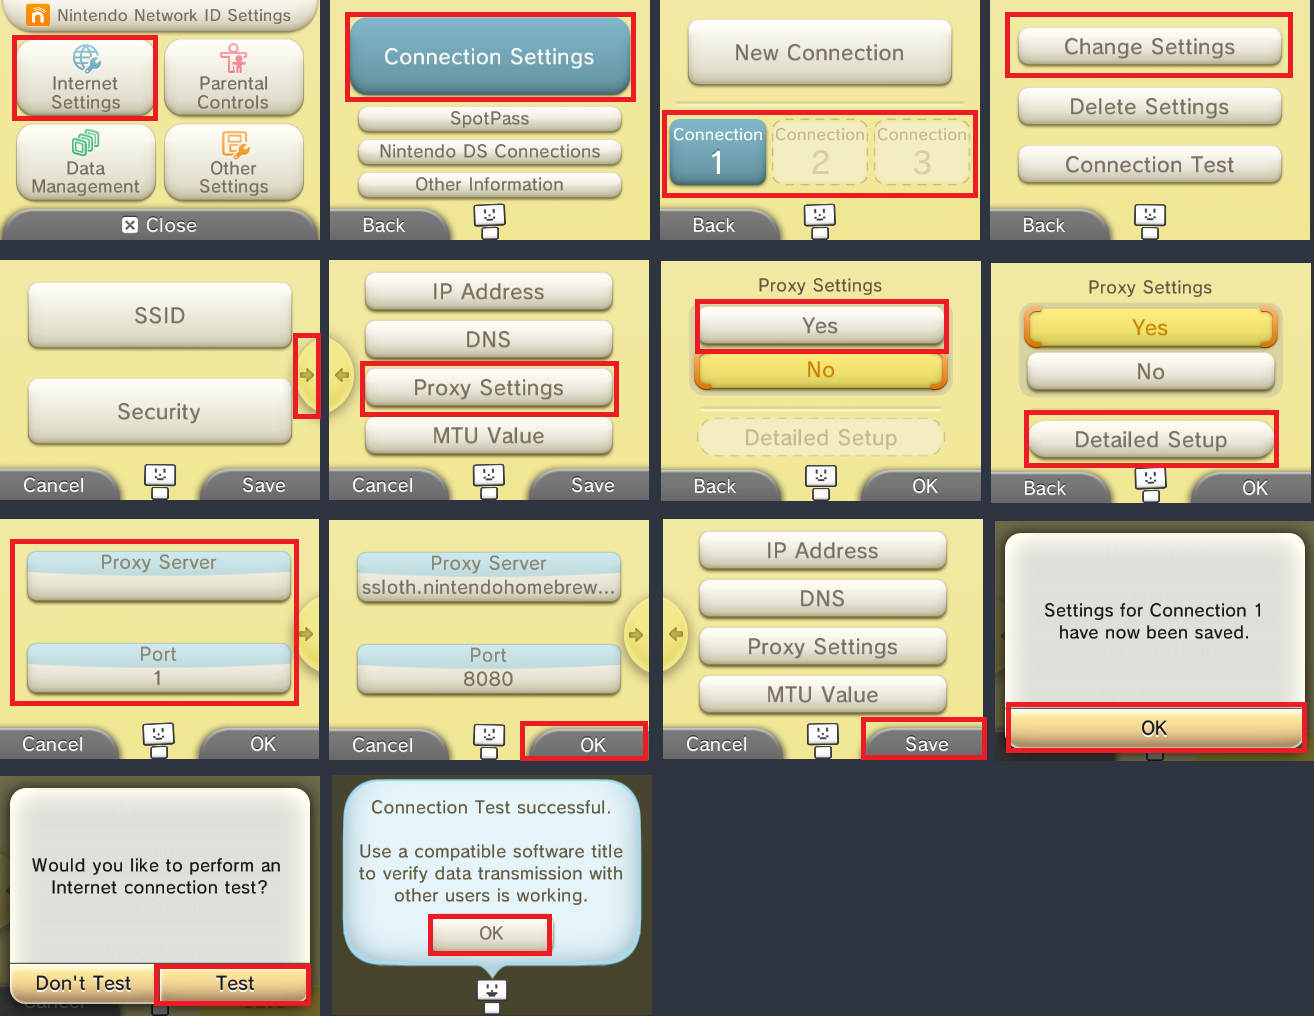
- Launch the System Settings application
- Navigate to
Internet Settings->Connection Settings - Click on your network connection slot and navigate to
Change Settings->Next Page (right arrow)->Proxy Settings - Set "Proxy Settings" to "Yes", then click
Detailed Setup - Set the Proxy Server to
ssloth.nintendohomebrew.com, and the Port to8080 - Click OK, then click Save
- When prompted, click "Test" to perform the connection test
- The test should succeed
- Click "OK" to continue
- Press "Back" twice, then "Close" to go back to the HOME Menu
Section III - Launching SafeB9SInstaller
In this section, you will visit the browser exploit webpage, which will use universal-otherapp to launch the boot9strap (custom firmware) installer.
On the HOME Menu, press the Left and Right shoulder buttons at the same time to open the camera
- If you are unable to open the camera, open the Internet Browser and manually type the URL instead (
https://zoogie.github.io/web/nbhax/)
- If you are unable to open the camera, open the Internet Browser and manually type the URL instead (
Tap the QR code button and scan this QR code
- When you get a prompt with error code
012-1511,032-1809or032-1820, press (A) to allow the connection - If you get a crash or a different error code, follow this troubleshooting guide
DANGER
If you receive a prompt telling you to update your console, STOP! Redo Section II from the beginning and ensure you have set up the proxy correctly.
- When you get a prompt with error code
Tap the "PROCEED TO HAXX" button
If the exploit was successful, you will have booted into SafeB9SInstaller
- If you get an error, follow this troubleshooting guide
- If troubleshooting fails and your console has only 2 working shoulder buttons, follow only Section IV of safecerthax
Section IV - Installing boot9strap
In this section, you will install custom firmware onto your console.
- When prompted, input the key combo given on the top screen to install boot9strap
- If a step on the lower screen has red-colored text, and you are not prompted to input a key combo, follow this troubleshooting guide
- Once it is complete, press (A) to reboot your console
- Your console should have booted into the Luma3DS configuration menu
- Luma3DS configuration menu are settings for the Luma3DS custom firmware. Many of these settings may be useful for customization or debugging
- For the purpose of this guide, leave these options on the default settings (do not check or uncheck anything)
- If your console displays a white notification LED and shuts down when you try to power it on, ensure that you have Luma3DS's
boot.firmon the root of SD card (insideLuma3DSvX.X.X.zip)
- Press (Start) to save and reboot
Section V - Restoring default proxy
In this section, you will restore the Internet settings back to normal.
- Launch the System Settings application
- Navigate to
Internet Settings->Connection Settings - Click on your network connection slot and navigate to
Change Settings->Next Page (right arrow)->Proxy Settings - Set "Proxy Settings" to "No"
- Click OK, then click Save
- When prompted, click "Test" to perform the connection test
- The test should succeed
- Power off your console
At this point, your console will boot to Luma3DS by default.
- Luma3DS does not look any different from the normal HOME Menu. If your console has booted into the HOME Menu, it is running custom firmware.
- On the next page, you will install useful homebrew applications to complete your setup.
TIP
Continue to Finalizing Setup