Finalizing Setup
Required Reading
On the previous page, you installed boot9strap, a custom firmware loader that loads the file boot.firm from SD card or NAND (internal memory). In this case, we are using Luma3DS by LumaTeam as our boot.firm to patch the console, allowing it to run homebrew software.
On this page, we will make critical system file backups and install some homebrew programs. Most of these steps will be automated using a script that you will run on your console.
INFO
The script will install the following applications:
- FBI by Steveice10 (installs CIA formatted applications)
- Homebrew Launcher Loader by PabloMK7 (runs Homebrew Launcher, for 3DSX format homebrew)
- Anemone3DS by astronautlevel2 (installs custom themes, splashes, and badges)
- Checkpoint by BernardoGiordano/FlagBrew (manages 3DS/DS game save data)
- ftpd by mtheall (allows wireless 3DS SD card access over FTP)
- Universal-Updater by Universal-Team (on-device app store for downloading homebrew over Wi-Fi)
- GodMode9 by d0k3 (multipurpose tool for extracting data from internal memory or cartridges)
If you don't want one of these applications, you can remove them after you have finished this page by navigating to System Settings -> Data Management -> Nintendo 3DS -> Software. (GodMode9 cannot be removed in this way and is generally required for other functions.)
Source code links (optional)
All applications installed on this guide are open-source. If you are interested in seeing how they work, or would like to leave a star to show your appreciation, their source code is linked here:
Compatibility Notes
INFO
If your previous CFW setup was EmuNAND-based and you wish to move the contents of your EmuNAND/RedNAND to SysNAND, follow Move EmuNAND before following this page. If you don't know what an EmuNAND is, this doesn't apply to you.
What You Need
- x_finalize_helper.firm (direct download)
- finalize.romfs (direct download)
Instructions
Section I - Prep Work
In this section, you will copy the files necessary to follow the rest of the instructions on this page.
- Power off your console
- Insert your SD card into your computer
- Copy
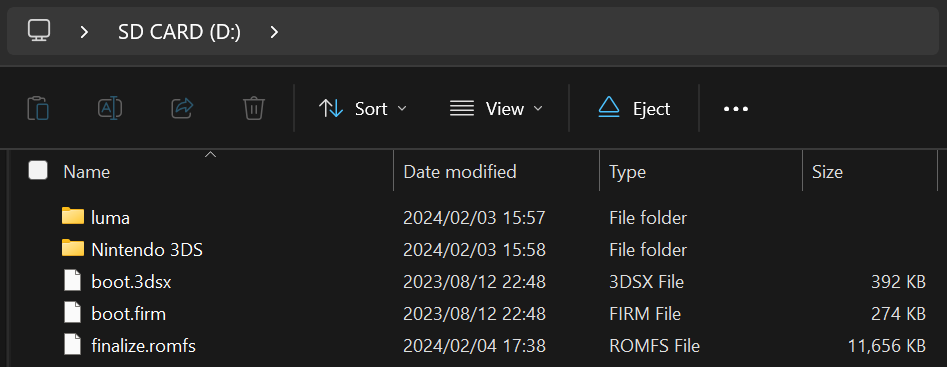
finalize.romfsto the root of your SD card - Open the
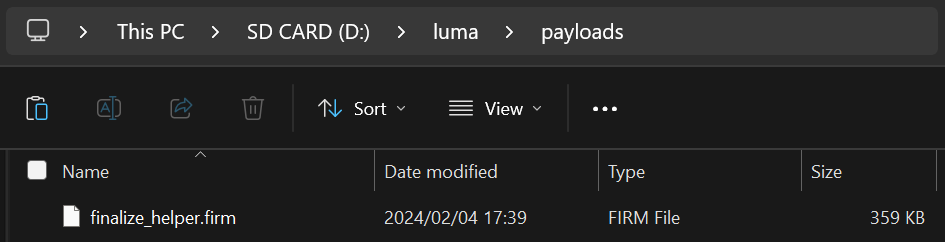
lumafolder on your SD card and create a folder namedpayloadsinside, if it does not already exist - Copy
x_finalize_helper.firmto thepayloadsfolder - Reinsert your SD card into your console
The screenshot below indicates the minimum SD card layout that is required to follow this page. You may have extra files or folders on your SD card, depending on your previous setup or the method that you followed.
INFO
INFO
Section II - Updating the System
In this section, you will update your system to the latest version, which is safe to do with custom firmware.
- Update your console by going to System Settings, then "Other Settings", then going all the way to the right and using "System Update"
- Updates while using B9S + Luma (what you have) are safe
- The updater may display a message saying "Your system is up to date" instead of updating. This is normal if you are already up to date; continue to the next section
- If this gives you an error, set your DNS settings to "Auto" and your Proxy settings to "No"
- If this still gives you an error, follow this troubleshooting guide
Section III - RTC and DSP setup
In this section, you will sync your 3DS internal clock with the actual time and dump the sound firmware (which is necesssary for some homebrew software to use sound properly).
- Press (Left Shoulder) + (D-Pad Down) + (Select) at the same time to open the Rosalina menu
- If one of these buttons is broken, download config.ini and put it in your
lumafolder, replacing the existing one. This will change the Rosalina menu key combination to (X) + (Y)
- If one of these buttons is broken, download config.ini and put it in your
- Select "Miscellaneous options"
- Select "Dump DSP firmware"
- Press (B) to continue
- Select "Nullify user time offset"
- Press (B) to continue
- Press (B) to return to the Rosalina main menu
- Press (B) to exit the Rosalina menu
Section IV - Setup Script
In this section, you will use a series of scripts to automate homebrew installation, SD card cleanup, and system file backup.
- Power off your console
- Press and hold (X), and while holding (X), power on your console. This will launch the Finalizing Setup Helper
- If you boot to the HOME Menu, your
payloadsfolder may be incorrectly spelled, orx_finalize_helper.firmmay be in the wrong location - If you encounter an error, consult the troubleshooting page
- If you boot to the HOME Menu, your
- After a few seconds, your console should automatically boot into GodMode9
- From this point forward, you can access GodMode9 by holding (Start) while powering on your console
- Holding (X) on boot will no longer do anything
- If necessary, configure GodMode9:
- If you are prompted to select a language, use the D-Pad and press (A) to select English
- This language choice only affects GodMode9's menu options
- You can set it to your language of choice after completing this guide
- If you are prompted to create an essential files backup, press (A) to do so, then press (A) to continue
- If you are prompted to fix the RTC date&time, press (A) to do so, then set the date and time, then press (A) to continue
- If you are prompted to select a language, use the D-Pad and press (A) to select English
- Once you see [root] and a list of drives, press (Home) to bring up the action menu
- Select "Scripts..." (not Lua scripts)
- Select "finalize"
- Follow the prompts in the script, answering any questions that you are asked
- If you see "Information #05: No title database", press (A) and enter the key combination on the bottom screen to proceed
- If you encounter an error, follow the instructions in the error message or consult the troubleshooting page, then open GodMode9 by holding (Start) on boot to re-run the script
- Once the script says "Setup complete!", press (A) to power off the device
- If you do NOT see the message "Setup complete!", the script was not successful and you will need to redo this section from Step 3
- Insert your SD card into your computer
- Copy the
/gm9/backups/folder to a safe location on your computer- This folder contains critical file backups and should be backed up to multiple locations (i.e. cloud storage) if possible
- The two SysNAND files are your NAND backup and can be used to revert your console to a working state if it is bricked by a software issue
- The
essential.exefsfile contains your console's system-unique files and can be used to recover your data in the event of a hardware failure
- If you still have them, delete the two
SysNANDfiles from the/gm9/backups/folder from your SD card- The
essential.exefsfile is small and may be kept on your SD card for ease of access
- The
TIP
You're done! Custom firmware is now fully configured on your console.
INFO
Trying to figure out what to do with your newly modded device? Visit our wiki!
Information and Notes
INFO
Here are some key combos that you should know:
- Holding (Select) on boot will launch the Luma3DS configuration menu.
- Holding (Start) on boot will launch GodMode9, or if you have multiple payloads in
/luma/payloads/, the Luma3DS chainloader. - By default, pressing (Left Shoulder) + (Down D-Pad) + (Select) while in 3DS mode will open the Rosalina menu, where you can check system information, take screenshots, enable cheats, and more. This can be changed from the Rosalina menu.
- Holding (Start) + (Select) + (X) on boot will make the notification LED show a color for debug purposes. See the changelog for a list.
Pretendo
Pretendo is a replacement service for the Nintendo Network, which resurrects online services from the now shut down Nintendo Network. It also revives the Miiverse service, via juxtaposition. The official guide can be found here.
Note: Pretendo does not support every online service, however work is being done to achieve this.
A list of games that Pretendo supports can be found here.
INFO
For information on using GodMode9's various features, check out the GodMode9 Usage and Dumping Titles and Game Cartridges pages.