Installing boot9strap (safecerthax)
Technical Details (optional)
For technical details on the exploit that you will be using on this page, see here.
Compatibility Notes
safecerthax is compatible with all Old 3DS and Old 2DS consoles in all regions on system versions 1.0.0 through 11.14.0.
This exploit will not work on the New 3DS, New 3DS XL, or New 2DS XL. Please ensure that the console you are modding is an Old 3DS, Old 3DS XL, or Old 2DS before continuing.
Qué necesitas
- The latest release of SafeB9SInstaller (direct download)
- The latest release of boot9strap (direct download)
- The latest release of Luma3DS (the Luma3DS
.zipfile)
Instrucciones
Section I - Hardware Button Check
In this section, you will see whether your shoulder buttons are working on your console. This will determine whether your console is compatible with this method.
- Power on your console
- Once you see the HOME Menu, press the (Left Shoulder) and (Right Shoulder) buttons at the same time
- The camera applet should appear
- Apaga tu consola
If the camera did NOT appear, you cannot follow this method. If this is the case, use Installing boot9strap (MSET9) instead.
Sección II - Preparativos
In this section, you will copy the files needed to trigger the safecerthax exploit.
- Inserta tu tarjeta SD en tu computadora
- Copia los archivos
boot.firmyboot.3dsxdesde el.zipde Luma3DS a la raíz de tu tarjeta SD- La raíz de tu tarjeta SD se refiere al primer directorio de la tarjeta, donde puedes ver la carpeta Nintendo 3DS pero no estás dentro de ella
- Crea una carpeta llamada
boot9strapen la raíz de tu tarjeta SD - Copia
boot9strap.firmyboot9strap.firm.shadesde el.zipdeboot9strapa la carpeta/boot9strap/en tu tarjeta SD - Copia
SafeB9SInstaller.bindesde el.zipde SafeB9SInstaller a la raíz de tu tarjeta SD - Reinsert your SD card into your console
- Power on your console
Section III - safecerthax proxy
In this section, you will change your Internet connection settings to use a proxy network designed to exploit the System Update feature of your console.
Si aún no lo has hecho, asegúrate de tener una conexión a Internet activa en tu consola.
Hay una guía visual para esta sección disponible aquí.
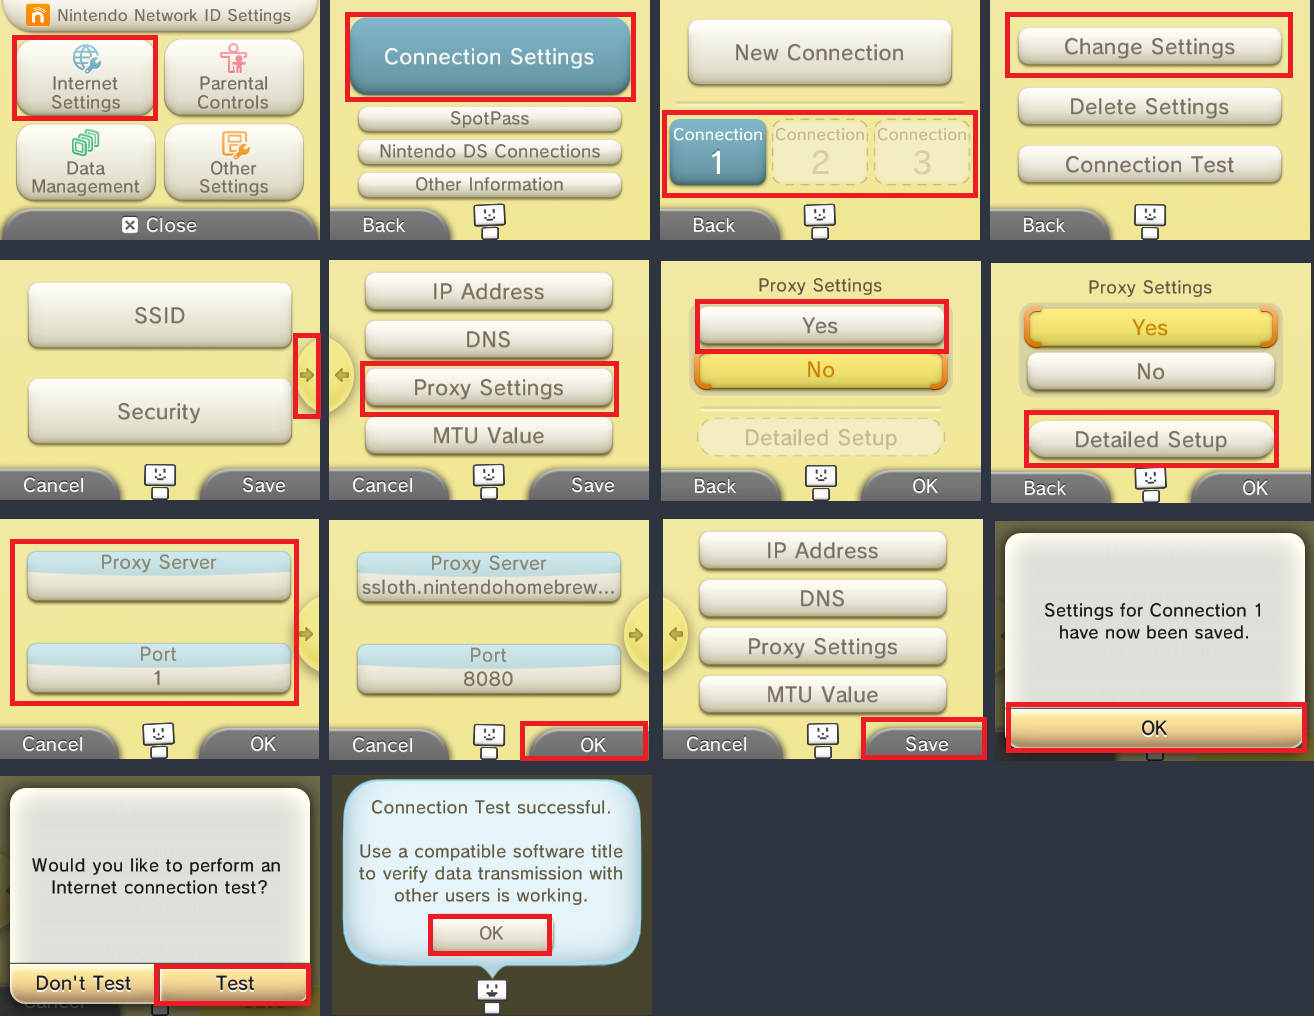
- Entra a Configuración de la Consola
- Ve a
Configuración de internet->Conexión a internet - Elige la conexión que corresponda y ve a
Modificar ajustes->Siguiente página (flecha derecha)->Servidor proxy - Cambia la opción de “Configuración de servidor proxy” a “Sí”, luego ve a “Ajustes avanzados”
- Establece el Servidor proxy a
ssloth.nintendohomebrew.com, y el Puerto a8080 - Toca en Aceptar, luego en Guardar
- Cuando se muestre, elige “Sí” a realizar la prueba de conexión
- La prueba debiera de ser exitosa
- Elige “Aceptar” para continuar
- Apaga tu consola
Section IV - safecerthax
In this section, you will enter Safe Mode (a feature available on all 3DS family consoles) where safecerthax will be triggered, which will launch you into the boot9strap (custom firmware) installer.
- With your console still powered off, hold the following buttons: (Left Shoulder) + (Right Shoulder) + (D-Pad Up) + (A), and while holding these buttons together, power on your console
- Keep holding the buttons until the console boots into Safe Mode (a “system update” menu)
- Press “OK” to accept the update
- There is no update. This is part of the exploit
- Press “I accept” to accept the terms and conditions
- The update will eventually fail, with the error code
003-1099. This is intended behaviour - Press “OK” to close the error message
- Si el exploit ha funcionado, habrás iniciado SafeB9SInstaller
- If the console freezes or crashes, force power off the console, then retry this section
Section V - Installing boot9strap
En esta sección, instalarás custom firmware en tu consola.
- Cuando se te pida, introduce la combinación de botones mostrada para instalar boot9strap
- Si algún paso en la pantalla inferior tiene el texto en color rojo y no se te pide que introduzcas una combinación de botones, sigue la guía de solución de problemas
- Una vez completado, pulsa (A) para reiniciar tu consola
- Tu consola debería haber iniciado en el menú de configuración de Luma3DS
- En el menú de configuración de Luma3DS están los ajustes para el custom firmware Luma3DS. La mayoría de estos ajustes son para customizar o para debugging
- Para los fines de esta guía, deja estas opciones en los valores por defecto (no marques ni desmarques nada)
- Si la consola se apaga cuando intentas encenderla, asegúrate de que copiaste
boot.firmdesde el archivo.zipde Luma3DS a la raíz de tu tarjeta SD
- Presiona (Start) para guardar y reiniciar
En este punto, tu consola arrancará en Luma3DS por defecto.
- Luma3DS no se ve distinto del Menú HOME normal. Si tu consola ha encendido y muestra el Menú HOME, está ejecutando custom firmware.
- En la siguiente página, instalarás aplicaciones útiles de homebrew para completar la instalación.
Section VI - Restoring default proxy
En esta sección, restaurarás la configuración de Internet a su estado original.
- Entra a Configuración de la Consola
- Ve a
Configuración de internet->Conexión a internet - Elige la conexión que corresponda y ve a
Modificar ajustes->Siguiente página (flecha derecha)->Servidor proxy - Cambia “Configuración del servidor proxy” a “No”
- Toca en Aceptar, luego en Guardar
- Cuando se muestre, elige “Sí” a realizar la prueba de conexión
- La prueba debiera de ser exitosa
- Apaga tu consola