boot9strap installeren (ntrboot)
Verplicht te lezen
Om de magnet links op deze pagina te kunnen gebruiken, heb je een torrent client zoals qBittorrent of Deluge nodig.
Wat je nodig hebt
- A magnet that triggers the sleep mode of your console (if using a folding style console)
- Je ntrboot geflashde flashkaart
- De nieuwste versie van SafeB9SInstaller (directe download)
- De nieuwste versie van boot9strap (directe download)
- De nieuwste versie van Luma3DS (het Luma3DS
.zipbestand)
Instructies
Deel I - Voorbereiding
- Zet je console uit
- Plaats de SD-kaart van je console in je computer
- Dit is de SD kaart van je 3DS, niet de SD kaart van je flashkaart
- Kopieer
SafeB9SInstaller.firmvan de SafeB9SInstaller.zipnaar de hoofdmap van je SD-kaart en hernoem het naarboot.firm- De hoofdmap van de SD-kaart verwijst naar de bovenste map van de SD-kaart, waarin je alle mappen op de SD-kaart kunt zien, waaronder de Nintendo 3DS map, zonder je in de Nintendo 3DS map te bevinden
- Kopieer
boot.3dsxvan de Luma3DS.zipnaar de hoofdmap van de SD kaart van je console - Maak een map genaamd
boot9strapop de hoofdmap van de SD kaart van je console -
Kopieer
boot9strap.firmenboot9strap.firm.shavan de boot9strap.zipnaar de/boot9strap/map op de SD kaart van je console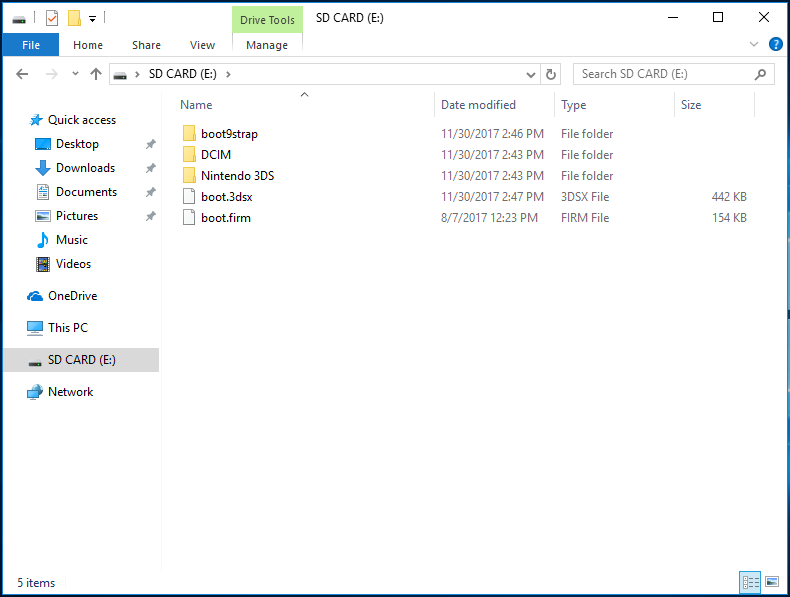
- Stop je SD-kaart terug in je console
- Zet je console aan
Deel II - Ntrboot
- Use the magnet to find the spot on your console where the sleep sensor is triggered Deze stap is niet nodig op de old 2SD (die heeft een slaap schakelaar)
- Zet je console uit
- Insert your flashcart into your console
- Place the magnet on your console to trigger the sleep sensor Op een old 2DS moet je de slaap modus schakelaar activeren
- Houd (Start) + (Select) + (X) + (Power) ingedrukt voor een paar secondes, en laat dan de knoppen los Het kost misschien een paar pogingen om dit te doen, de positie is erg ongemakkelijk
- Als de exploit succesvol was, zal je SafeB9SInstaller hebben opgestart
- Remove the magnet from your console Op een old 2DS, zet de slaap modus schakelaar uit
Deel III - Boot9strap installeren
In this section, you will install custom firmware onto your console.
- When prompted, input the key combo given on the top screen to install boot9strap
- If a step on the lower screen has red-colored text, and you are not prompted to input a key combo, follow this troubleshooting guide
- Once it is completed, force your console to power off by holding down the power button
- Your console will only boot to the SafeB9SInstaller screen until the next section is completed
Deel IV - Luma3DS configureren
- Plaats de SD-kaart van je console in je computer
- Verwijder`boot.firm’ en ‘’ van de hoofdmap van uw SD-kaart
- Kopieer
boot.firmvan de Luma3DS.zipnaar de hoofdmap van je SD kaart - Stop je SD-kaart terug in je console
- Zet je console aan
- Your console should have booted into the Luma3DS configuration menu
- Luma3DS configuration menu are settings for the Luma3DS custom firmware. Veel van deze instellingen kunnen nuttig zijn voor aanpassing of debugging
- For the purpose of this guide, leave these options on the default settings (do not check or uncheck anything)
- If your console shuts down when you try to power it on, ensure that you have copied
boot.firmfrom the Luma3DS.zipto the root of your SD card
- Druk op (Start) om op te slaan en opnieuw op te starten
At this point, your console will boot to Luma3DS by default.
- Luma3DS does not look any different from the normal HOME Menu. If your console has booted into the HOME Menu, it is running custom firmware.
- On the next page, you will install useful homebrew applications to complete your setup.
Doorgaan naar Installatie voltooien
Het volgende is een optionele sectie waarmee je je flashkaart terug zet naar de originele status (om de originele functies te gebruiken).
De acekard 2i kan nog steeds .nds bestanden starten terwijl ntrboot geinstalleerd is. Dit werkt alleen wanneer de Acekard2i in NDS modus is of op een CFW 3DS! Terwijl de ntrboot exploit geinstalleerd is op de Acekard 2i, kan het niet .nds bestanden starten op de DSi of een normale 3DS.
Volg niet deze sectie tot je de rest van de instructies gevolgt hebt.
Sectie V - ntrboot verwijderen
Wat je nodig hebt
- De nieuwste versie van ntrboot_flasher (
ntrboot_flasher.firm) - De flashrom backup van jou specefieke flashkaart
Als je ntrboot flashen (3DS meerdere systemen) hebt gevolgt, zal de flashrom backup al bestaan op de correcte locatie en hoeft niet nog een keer gedownload worden
- Merk op dat als je ntrboot flashen (3DS 1 systeem) of ntrboot flashen (NDS), de flashrom backup bestaat al op de SD kaart van je flashkaart en moet worden gekopieerd naar de locatie die hieronder is opgegeven Als je niet weet welke HW versie je hebt, probeer elke voor jou kaart. Alleen de juiste zal je flashkaart laten starten vanuit het HOME-menu, maar het verkeerde zal de kaart niet bricken
| Flashkaart | Hardware Versie | Flashrom |
|---|---|---|
| Ace3DS X | N/A | |
| Acekard 2i | HW 81 | - Acekard_2i_(HW_81)-Flashrom.zip |
| Acekard 2i | HW 44 | - Acekard_2i_(HW_44)-Flashrom.zip |
| DSTT | missend | |
| Infinity 3 R4i | HW A5 | - R4i_Gold_3DS_(HW_A5)-Flashrom.zip |
| R4 3D Revolution | HW A6 | - R4i_Gold_3DS_(HW_A6)-Flashrom.zip |
| R4i Gold 3DS Deluxe “Starter” | Missend | |
| R4i Gold 3DS | HW 4 | - R4i_Gold_3DS_(HW_4)-Flashrom.zip |
| R4i Gold 3DS | HW 5 | Missend |
| R4i Gold 3DS | HW 6 | Missend |
| R4i Gold 3DS | HW 7 | Missend |
| R4i Gold 3DS | HW 8 | - R4i_Gold_3DS_(HW_8)-Flashrom.zip |
| R4i Gold 3DS | HW D | - R4i_Gold_3DS_(HW_D)-Flashrom.zip |
| R4i Gold 3DS Plus | N/A | |
| R4i Gold 3DS RTS | HW A5 | - R4i_Gold_3DS_(HW_A5)-Flashrom.zip |
| R4i Gold 3DS RTS | HW A6 | - R4i_Gold_3DS_(HW_A6)-Flashrom.zip |
| R4i Gold 3DS RTS | HW A7 | - R4i_Gold_3DS_(HW_A7)-Flashrom.zip |
| R4i Ultra | - R4i_Ultra-Flashrom.zip | |
| R4i-SDHC 3DS RTS | - R4i-SDHC_3DS_RTS_B9S-Flashrom.zip | |
| R4i-SDHC B9S | - R4i-SDHC_3DS_RTS_B9S-Flashrom.zip | |
| R4iSDHC GOLD Pro 20XX van r4isdhc .com | - R4iSDHC.com_20XX-Flashrom.zip | |
| R4iSDHC RTS LITE 20XX van r4isdhc .com | - R4iSDHC.com_20XX-Flashrom.zip | |
| R4iSDHC Dual-Core 20XX van r4isdhc .com | - R4iSDHC.com_20XX-Flashrom.zip |
Instructies
- Zet je console uit
- Plaats je SD kaart in je computer
- Dit is de SD kaart van je 3DS, niet de SD kaart van je flashkaart
- Maak een map genaamd
ntrbootaan op de hoofdmap van je SD-kaart - Koppieer het
.binbestand van je flashrom backup.zipnaar de/ntrboot/map op de hooftmap van je SD kaart - Maak een map en noem het
payloadsin delumamap op je SD kaart - Koppieer
ntrboot_flasher.firmnaar de/luma/payloads/map op je SD kaart - Stop je SD-kaart terug in je console
- Insert your ntrboot compatible DS / DSi flashcart into your console
- Open ntrboot_flasher door (Start) ingedrukt te houden bij het opstarten van je 3DS
- Lees de waarshuwing op het rode scherm
- Druk op (A) om door te gaan
- Selecteer je flashkaart
- Als je je flashkaart niet op de lijst vanboven ziet lees dan het onderste scherm voor extra info over elke optie
- Selecteer “Restore Flash”
- Druk op (A) om verder te gaan
- Wacht totdat het proces voltooid is
- Druk op (A) om terug te gaan naar het hoofdmenu
- Press (B) to power off your console